GetMyPov - User guide
Index:
- Common features
- Common features of the main panel
- The content of the main panel
- Preview minimization
- The use as a stand-alone app
- The Remote device section
- Levels of controllability
- Following the orientation of the source device
- Recording of the incoming streaming
- Local recording
- The Zoom control
- "Only motion" option
- Receiving a frames-collection file
- Accessing files
- Operations on files
- Sending a frames-collection file
- The Frame viewer
- Remote desktop
- App settings
- GetMyPov f / GetMyPov c - Specific features
- GetMyPov c / GetMyPov h - Specific features
- GetMyPov h - Specific features
Common features
All of the three apps of the GetMyPov family are structured with one main panel, the container of the main commands, a settings view and a file browser that navigates through the resources that the app can have previously collected from direct recording of the local camera video capturing or the recording of the video streaming coming from a partner device. Along the file navigation the user reaches the availability of a powerful viewer to analyze and play the collected resources.
The main panel contains a "Mode" selector that allows the fast settings for various different contexts of use.
Then a "START" button exists for starting a streaming communication session (receiving, sending or both). After a 'start' event the panel keeps being available changing its composition as needed. Upon the reception of an incoming video streaming this is displayed under the commands that therefore stay superimposed on the scene.
Settings view is reachable from the main panel and is the same both in GetMyPov f and GetMyPov c while it lightly differs in GetMyPov h.
The file browser, with its tools, is identical in all of the three apps and it is accessible from the main panel through the selection of the "Files" mode or the "File sender" mode.
Inside the local network the app can either run relying on automatic discovery of the peers or on explicit reference of them by their network address, previously stored in an internal connection database.
Any network connection occurs in the form of a client-server relation and the role of each side is either automatically assigned upon automatic discovery or defined by the specific running mode a part from GetMyPov h behaving, almost totally, as a 'client'. At the top right corner of the main panel the user can see a '(S)' symbol that states the device behaving as network server. This aspect may not be a concern for the user in the most part of cases but can clarify the expected behavior in scenarios where there is an interchange of devices and part of them does not ever make a "stop".
For a whatever communication that might happen among peers running one of the GetMyPov apps, it is required that the attendees share the same password stored in the settings context of the app - Each app on installation is initialized with a "factory" password. If you know that nobody changed the factory settings, no action is required to start, else the Settings view must be entered to update the password value.
The following are the "Modes" in common to all the three apps:
- Remote recorder
It was designed for situations where one only and simple action is needed to configure quickly and optimally one remote recorder, to which one (in GetMyPov h, many) watcher smartphone can forward what it sees, relying on a safe recording, kept far away from its potential vulnerability, therefore. It makes the following settings:- camera: Off
- recording: On
- scene visualization: Off
- Only discovery (local) It has been thought to polulate the connection database (accessible in the 'Settings' view, in the 'Network data' section) with the local network addresses of all the peers present in the wi-fi network and running in the same mode. The connection name receives its value from the name registered in the discovered partner, and if this is an empty field in the settings of the partner's context, a synthesized name is produced using the last part of the local network address preceded by an underscore. Note: this population occurs even 'behind the scenes', when any automatic discovery is executed, but this mode allows the user to get a better feedback about this.
- Files It lets the user access the file system and allows file (frames collection) transfers by means of "send" or "get" actions and relying on automatic discovery of the partner which is involved in the communication.
- File sender It lets the user send a file (frames collection) identifying the destination through the connection database
- File receiver It lets the user receive a file (frames collection) being addressed by the sender through the current network address (detectable in the "Settings view" -> "Behavior as server" section) and supposed known to the sender.
Common features of the main panel
- At the top of the main panel two monitor lines, just below the system bar, inform the user about the state of the app.
In particular their content is:
- information about transient phases
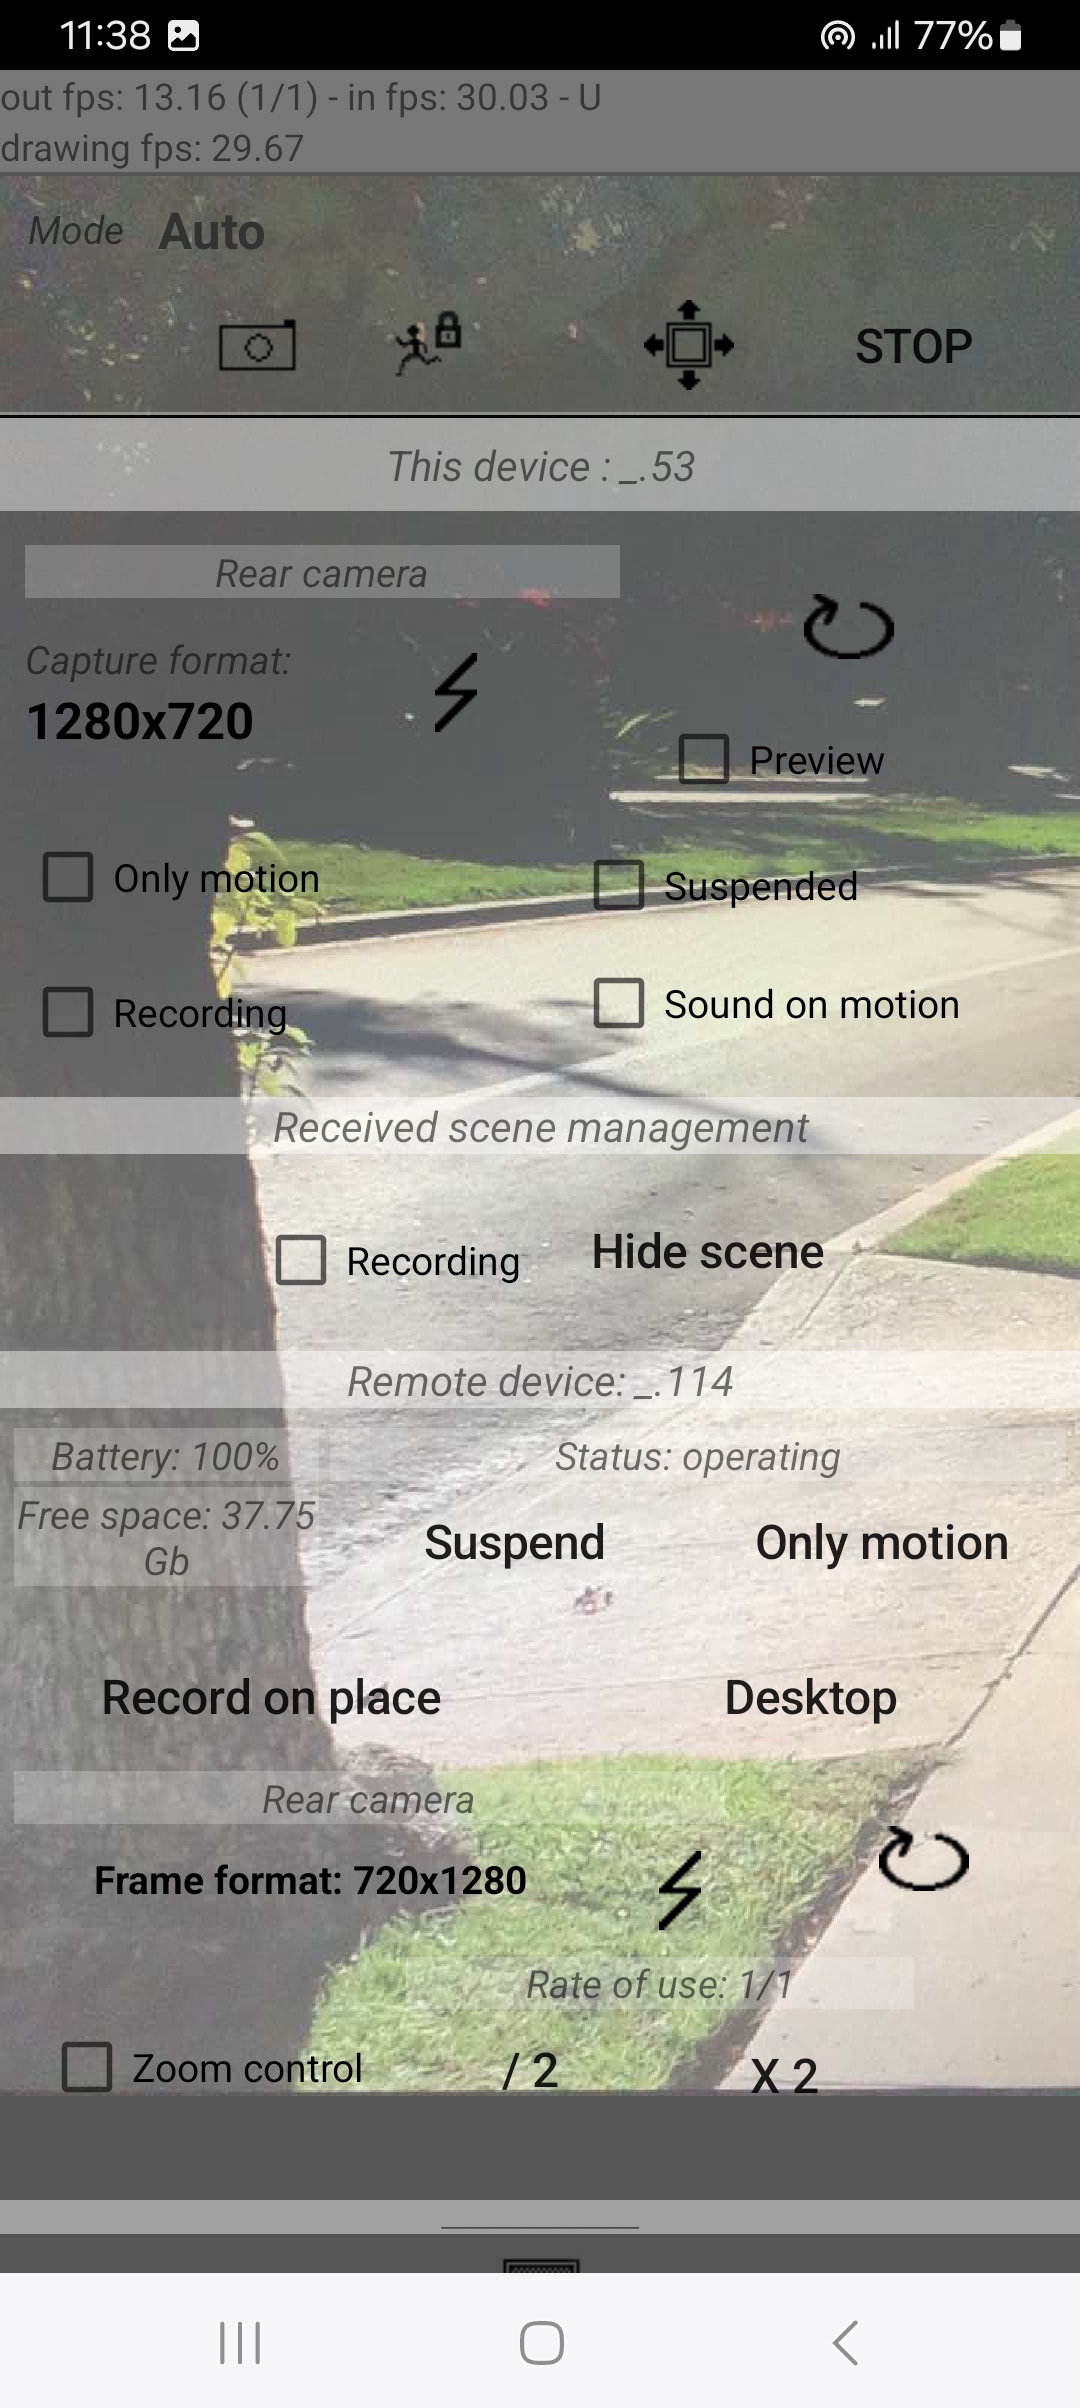
- flow information (where rates are in frames per second) having the format: out fps: [fps] (1/[N]) - in fps: [fps] - [remote dev. orient.] where :
-
on incoming streaming:
- in fps represents the incoming flow rate
- remote dev. orient. may be one of U (Up), R (right), D (down), L (left)} where "right" is a 90 degrees clockwise rotation in respect of the portrait (Up) orientation, keeping the display in front on outgoing streaming:
- out fps represents the outgoing flow rate
- 1/N is the rate of use of the main app processor that takes in consideration only one in N frames coming from the camera hardware. N is settable in the Settings view with the "Rate of use for forwarding" item (default is 1/1 - all the frame are processed).
- the rate in drawing on the screen (frames per second)
- Buttons are made of black-colored text or by an icon, and are without border while nearly all the labels are rendered with gray-colored text and italic style. Other commands and options are rendered as familiar user interface objects.
- When the content of the panel overflows at the bottom, it can be scrolled vertically leaving the top region anchored for easy control of the session.
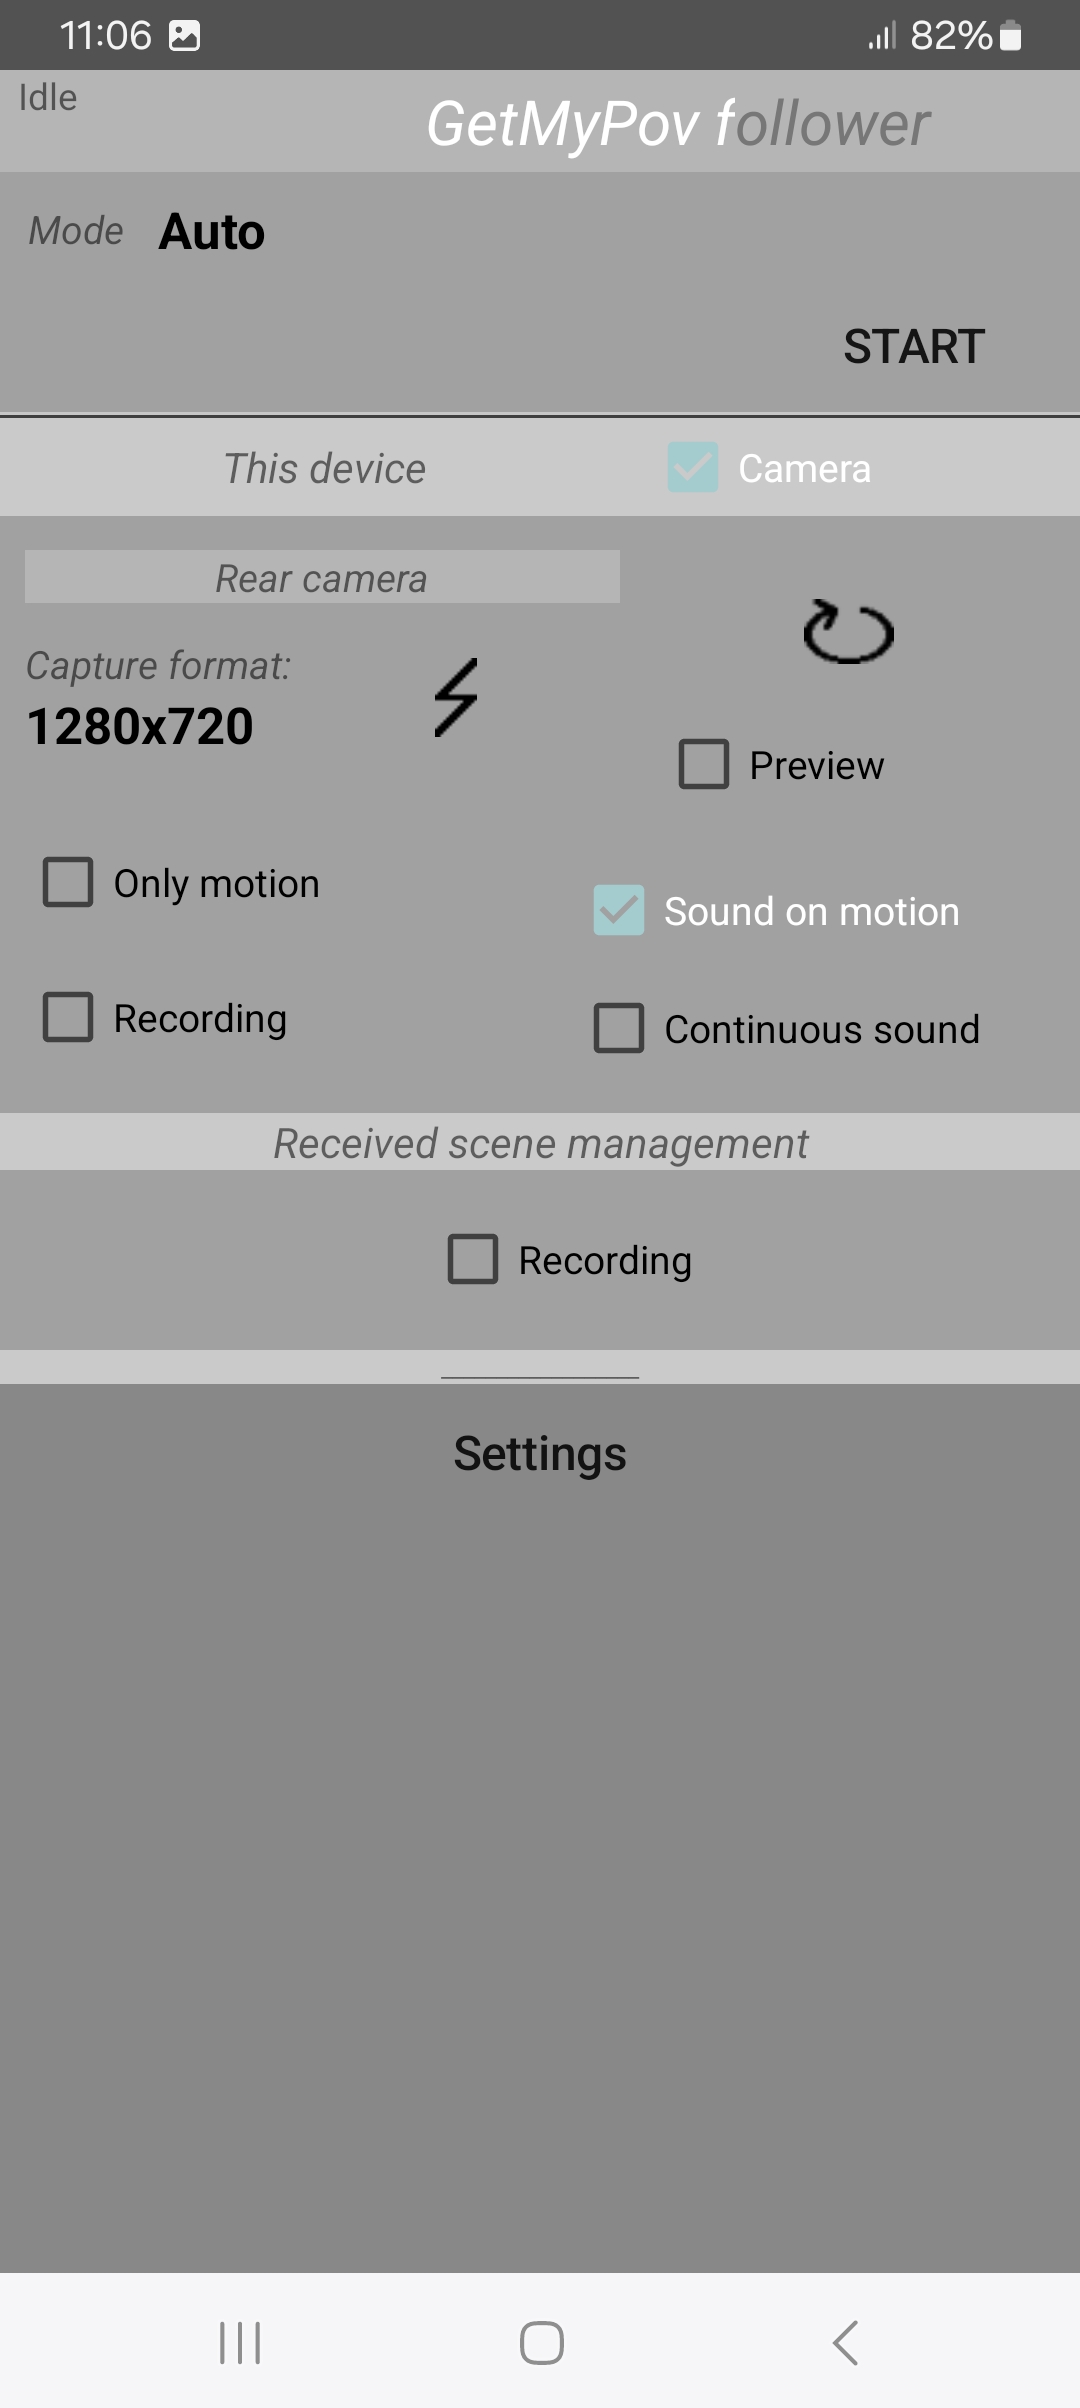
The content of the main panel
When the panel is in the idle state and the mode or its options determine the local camera be active, the "This device" section appears under so titled white strip. It allows the user:
- to select the current camera (rear/front) by means of the
 button
 - to select the capture format by touching directly the numeric expression of it
- to set the use of the flash light by means of the
 button
 - to activate the Preview of the local capturing camera. This action behaves like this:
- If network is not available it performes immediately else the user have to wait for connection result (either successful or failing).
- A surrounding yellow rectangle appears when the previewing hides the visualization of the possible incoming streaming
- to reset the possible zoom performed by the app, as consequence of remote control, by means of the "Zoom control" checkbox.
- to preset the 'local recording' that will tack place with the outgoing streaming or with previewing.
- to switch the Only motion option on
- to switch the Sound on motion option on
- to switch the Continuous sound sub-option on
When the panel is not in the idle state it presents always at the bottom the "black" button  that allows the screen to become black
(a long touch drives to the normal aspect).
that allows the screen to become black
(a long touch drives to the normal aspect).
When an incoming streaming occurs the 'Received scene management' section appears with the additional button "Hide scene", useful to safe energy when the device is recording. In this situation even the "Remote device" section (described below) appears also and three Buttons at the same level of the "Stop" button appears too. These buttons are:
- Snap shot
 : that lets the user save single frames during the observation
 - Still frame
 : that beyond saving the frame, freezes it on the screen until the "Release still frame" button is touched
 - Full screen
 : that allows to hide the whole graphic user interface, letting viewing the scene in full-screen mode. The user exits from this mode by means of the
  button.
If the local camera is active and in the "This device" section the 'Only motion' checkbox is selected, at the bottom of the section the "Motion monitor" appears with the "/" floating bar to give to the user the feedback on the motion detection activity, and just above there is the "Suspended" checkbox that is either a spy on camera activity or a command to force the suspension of it.
Preview minimization
Previewing che be minimized in the following steps:
- Once the you have checked the 'Preview' checkbox, you have started the session and previewing appeared:
- touch the 'full screen' button
- make a double touch on the screen -> the preview region will reduce its size and will go to the top right corner (a new double touch will restore the normal layout).
- you can even exit the full screen view: preview will mantain its layout.
The use as a stand-alone app
The app can be used without the availability of the network, relying on the preview and on all the features available in the "This device" section.
Once the session has "started" (with the "Camera" and the "Preview" checkboxes selected) the preview can be inspected by means of the () button and the two-fingers gesture allows the narrowing of the processing area,
that is, the area on which the available features will apply.
At any moment, when the network availability occurred, that app would start behaving as expected in the network scenario.
The Remote device section
It appears when an incoming video streaming occurs and previewing is off, and behaves differently depending on the controllability of the transmitter.
For this let's define the following set of levels of controllability: no control, partial control, total control where every relation among partners refers to.
Next the composition of the section is presented for each level and, after that, a dedicated table presents an accurate scheme about when each level occurs.
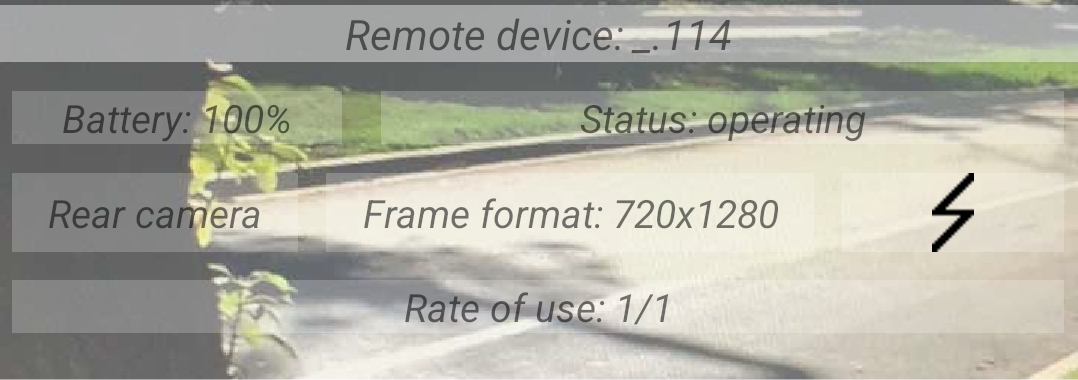
If the device has no control on the target, the section simply informs about:
- the name of the remote device (in the section heading) as it has been set in the Settings view of the partner
- the status of activity: one value in "operating", "motion only", "waiting for motion", "suspended"
- the battery charge status
- the side of the camera
- the frame format the transmitter forwards
- the status of use of the flash light (black = off, yellow = on)
- the rate of use operated by the transmitter in forwarding frames and in its possible local recording activity
If the status of activity is "waiting for motion" or "suspended" the only present item is the battery status. If the streaming is being received from a "repeater", in addition, the battery status of the repeater is visible .
If the device has partial control on the target, the section is populated with 'some' commands for making remote control, that is commands for:
- changing the capture format of the active camera, that is the format as exposed by tha camera hardware that is expressed referring to the device in landscape layout. By touching the Frame format item the user gets the list of the capture formats accepted by the remote app for the current camera. The user then can select one value in the list and, after that, the Frame format is the same as the capture format but expressed from the point of view of the consumer of the frame. Then if a Zoom control action is performed the frame format will not be included in the Capture format set (see below)
- turning the flashlight on/off tapping on the
 item
item - changing the active camera (front/rear) by tapping on the item
- transforming the two-fingers action, available in full-screen mode () from a local processing to a remote one,
by selecting the Zoom control checkbox. Note: the remote status of the zoom may be reset either with zoom-out actions, with the "Reset" command or by the target device with the Reset zoom button.
- Suspending the remote camera session
- Making the remote camera session resuming from suspension If the status of activity is "waiting for motion" or "suspended" the one only command present is that one useful to exit the specific sleeping scheme.
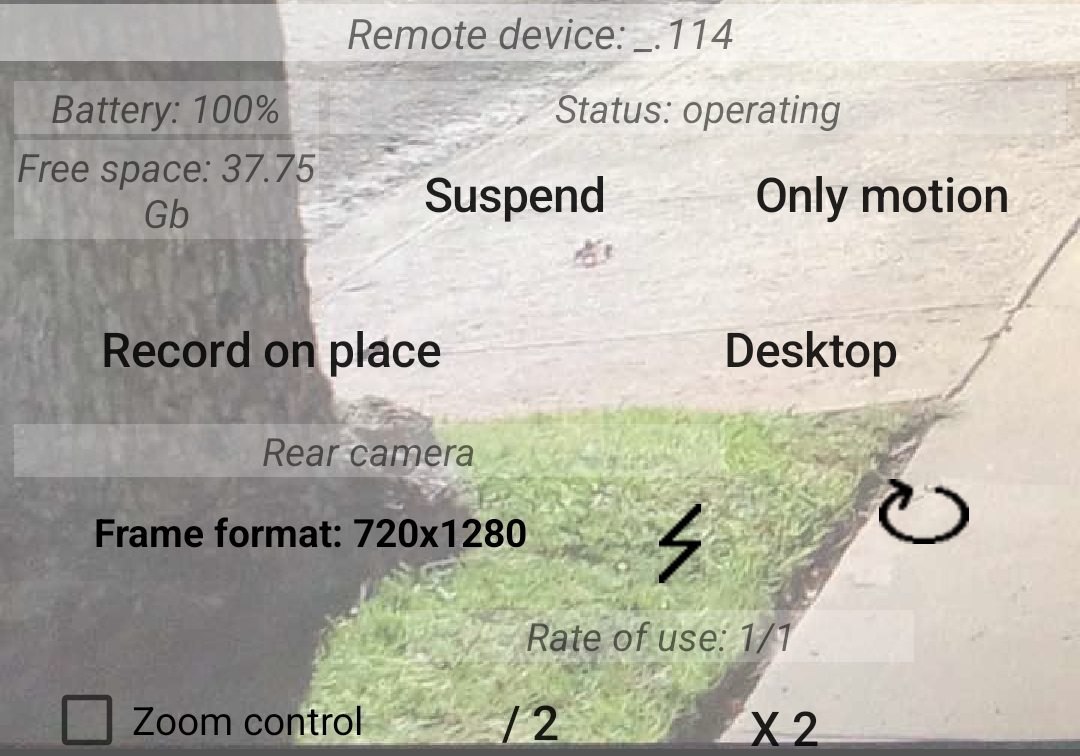
If the device has total control on the target, the section is populated even with the following control capabilities:
- decreasing or increasing the rate of use of frames coming from the camera, by touching respectively the X2 item or the /2 item
- switching on/off the "Only motion" option for the remote camera session
- activate(/deactivate) the recording activity on the target (that is made there locally) by means of the "Record on place" button
- activate(/deactivate) the "motion follower" feature on the target when the feature is available on the target (that is when the target is an instance of GetMyPov c and for a GetMyPov c instance when the target is also a GetMyPov h instance) by means of the "Start following motion" button
- Access to the remote desktop of the target, with capability to list, play, download and delete all the frames-collections produced on the target device, on place. The related command is the "Desktop" button.
Levels of controllability of transmitters by receivers
| Transmitter | |||||
|---|---|---|---|---|---|
| GetMyPov f / GetMyPov c | GetMyPov h | "Remotely controllable" attribute disabled |
|||
| Receiver | Automatic discovery in local net | Explicit use of net address | Automatic discovery in local net | Explicit use of net address | |
| GetMyPov f | Total | Partial | None | None | None |
| GetMyPov c | Total | Total | Total | Total | None |
| GetMyPov h | Total | Total | FORBIDDEN | Total (*) | None |
(*) The only relation possible between two GetMyPov h instances is when one runs in "Repeater" mode with the "As server" attribute set, and the other runs in "Broadcast" mode with the "Discover" attribute unset, having the network address and ports of the first instance in its connection database. In these circumstances the first instance acts as receiver and can totally control the second one.
Following the orientation of the source device
The remote side of the app and the local one (or if you prefer the outgoing streaming and incoming streaming processing) work together in order the observer to get a scene always comfortable to understand, speaking about orientation.
This means that no matter which orientation has each device: the scene is always oriented as the "reality".
Moreover, in order to get the most extensive surface for visualization, in other words, to "follow" the scene, the receiver can rotate his/her device staying within an angle of 90 degrees, whichever rotation the remote device is subject to.
Recording of the incoming streaming
To record the incoming streaming use the "Recording" checkbox available inside the "Received scene management" section of the main panel
This checkbox becomes disabled on previewing and becomes "red" when the effective recording occurs.
Each recording session can produce more than one file: in the Settings view the user can choose not to request the app to compensate remote orientation changes, by activating the "No rotation adjustment segmentation" switch. In this case, for each recording session, one only file will be generated and the same will be for the possible mp4 sharable file that the user could wish to build at a later time.
In the case the "No rotation adjustment segmentation" option is left deactivated, a recording session might generate more than one file, one more file for each portrait/landscape change, made by the video-capturing device (see Accessing files). In the latter case, the default case, the possible mp4 sharable files built at a later time, correspondingly to the recording session, will not require rotation adjustment to the player.
Even connection break and resuming can lead to the generation of many files within the recording session. The scenario is different depending on whether the break was caused by a network failure or since the partner made a stop. In the first case the native count is reset only if the transmitter reaches its suspended state.
Local recording
Meaning the record activity performed by the device that is making video capturing with its camera, local recording can be activated either "locally" by means of the "Recording" checkbox located in the "This device" section (checkbox that also acquires red colored background on effective recording), or "remotely" by the use of the "Record on place" button located in the Remote device section of the partner in the case the latter gets "total control" on the transmitter.
Following a scene in full-screen mode
Full-screen mode obtainable with the Screen button, shows the name of the source device at the bottom right corner of the scene frame and next to it a small red square in the case recording is on.
Then the mode allows zooming on the scene details and the scrolling of the enlarged scene, by means of the usual gestures.
Here taking snap-shots is still possible: a simple touch on the scene gets this result
Note that, in this mode, the rotation of the device gets a quicker adjustment of the scene than in the case of normal viewing, making even faster following the possibly rotating scene coming from the source.
Full-screen mode can be exited by means of a long touch.
The Zoom control
Before touching the button to enter the full-screen mode the user can select the "Zoom control" checkbox: it is a modifier of the effect of
the zoom-in/zoom-out/scroll gestures: no more a simple operation applied on displaying but a change in the portion of capturing area the remote device considers to process and forward frames:
- no more the entire frame captured by the camera (at the selected capture-format) is processed but a sub-area of it. The extent and the position of this picking-up sub-area are controlled remotely by "this" controlling device, that retains no state about the sub-area data. The state lives in the controlled device, instead, and is kept for each of the different sides of the capturing device, independently one another.
- Beyond the change of what locally displayed, the user, once exited the full-screen mode (by long-touching), can appreciate an higher incoming frame rate
due to the smaller size of frames coming in.
The Frame format item has two functions:
- visualizes a frame-format expression, describing the incoming streaming but
- when touched, it opens a menu containing the list of capture-format expressions, as a tool for remotely changing the capture-format of the watching device.
A change of the Capture format, by touching the frame format expression and selecting a value in the menu this way opened, resets the zoom on the remote device.
A change-camera action, instead, lets that state survive on the side being abandoned.
- quality of image
- fluidity of the scene allowed by a sufficient frame rate.
- wide area to look around (scrolling the zoomed scene).
"Only motion" option: the behavior of the "/" floating bar
Located in the "This device" section, when the "Only motion" checkbox is checked, the floating bar in presence of motion keeps repeating the following sequence: "\", "|", "/".
When motion stops the bar stops moving, and after a configurable period of time (see App settings - Motion sustain), appears as "----", declaring that the session has reached the no motion state.
With the last transition, any device listening to this emitting device is notified and its receiving part comes to the "Wait for motion" state, detectable by the user in the "Remote device" section.
Waking the remote device up from sleeping
The remote device can stay in two different forms of sleeping:
- 'Only motion' mode + no motion, that is perceived on the receiver side through the "waiting for motion" status and that receiver can interrupt (in the case it has "total" control on the transmitter - see the table above) by means of the switch m.only off command, that produces, beyond the declared task, the side effect to wake up immediately the remote device.
- Suspension, that is perceived on the following/controlling side through the "suspended" status and that the receiver can interrupt (in the case it has at least "partial" control on the transmitter) by means of the Resume command. Differently here the wake up process takes longer because, in suspension, the remote device released many resources and uses a very low frequency to listen on the network. So the 'Resume' command produces a count down that start at 15 seconds.
Stopping any activity
The main panel "Stop" button, available provided that the app is not in full-screen mode, is visible either when the panel is in an awaiting state or when a streaming flows: this way the user can interrupt both the situations, driving the panel to its idle state. In order to exit the full-screen mode a long touch is required.
The interruption of an awaiting state is almost immediate while the interruption of the streaming can take longer, up to a few seconds.
Stopping the sending and the receiving of frames-collection files or the building of mp4 files, requires to use dedicated "cancel" buttons available in the respective contexts, instead.
Receiving a frames-collection file
To do this, in the "Idle" state, do one of the following:
- to receive within the local network, with automatic sender detection, select the "File" mode
- to make the device addressable as a server (via the physically assigned network address and the ports that the user has specified in the "Settings" view), select the "File receiver" mode
Then tap the "Get" button.
The receiver user must wait for the transmitter, within about ten seconds, to perform the complementary action ("Sending a frame collection file", described later in "Accessing files - File operations")
When the transfer starts the user can see info related to the operation and a final message is displayed when the transfer ends, informing about the directory location of the received file.
Accessing files
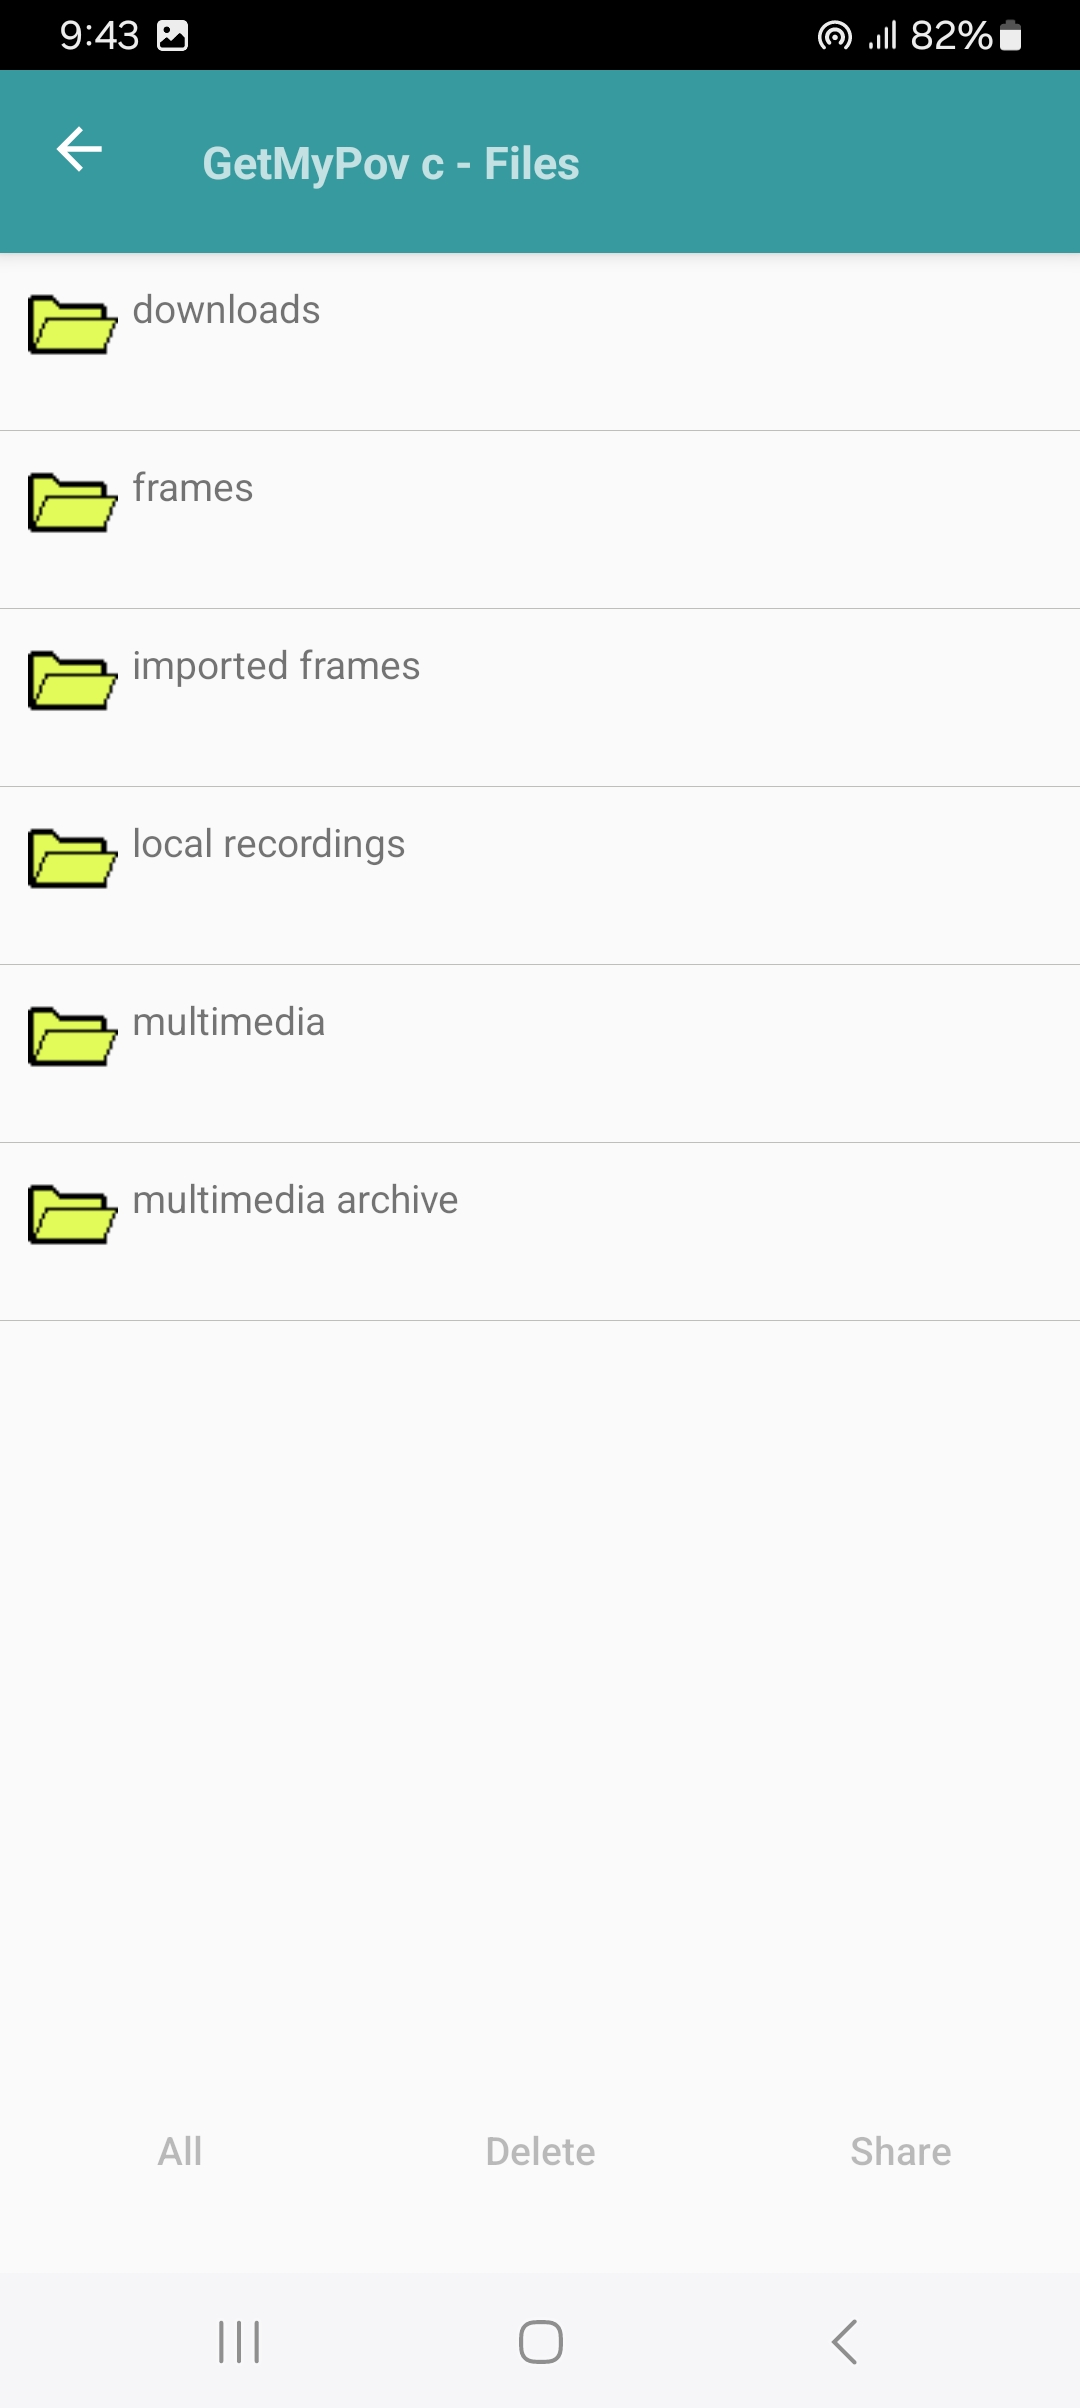
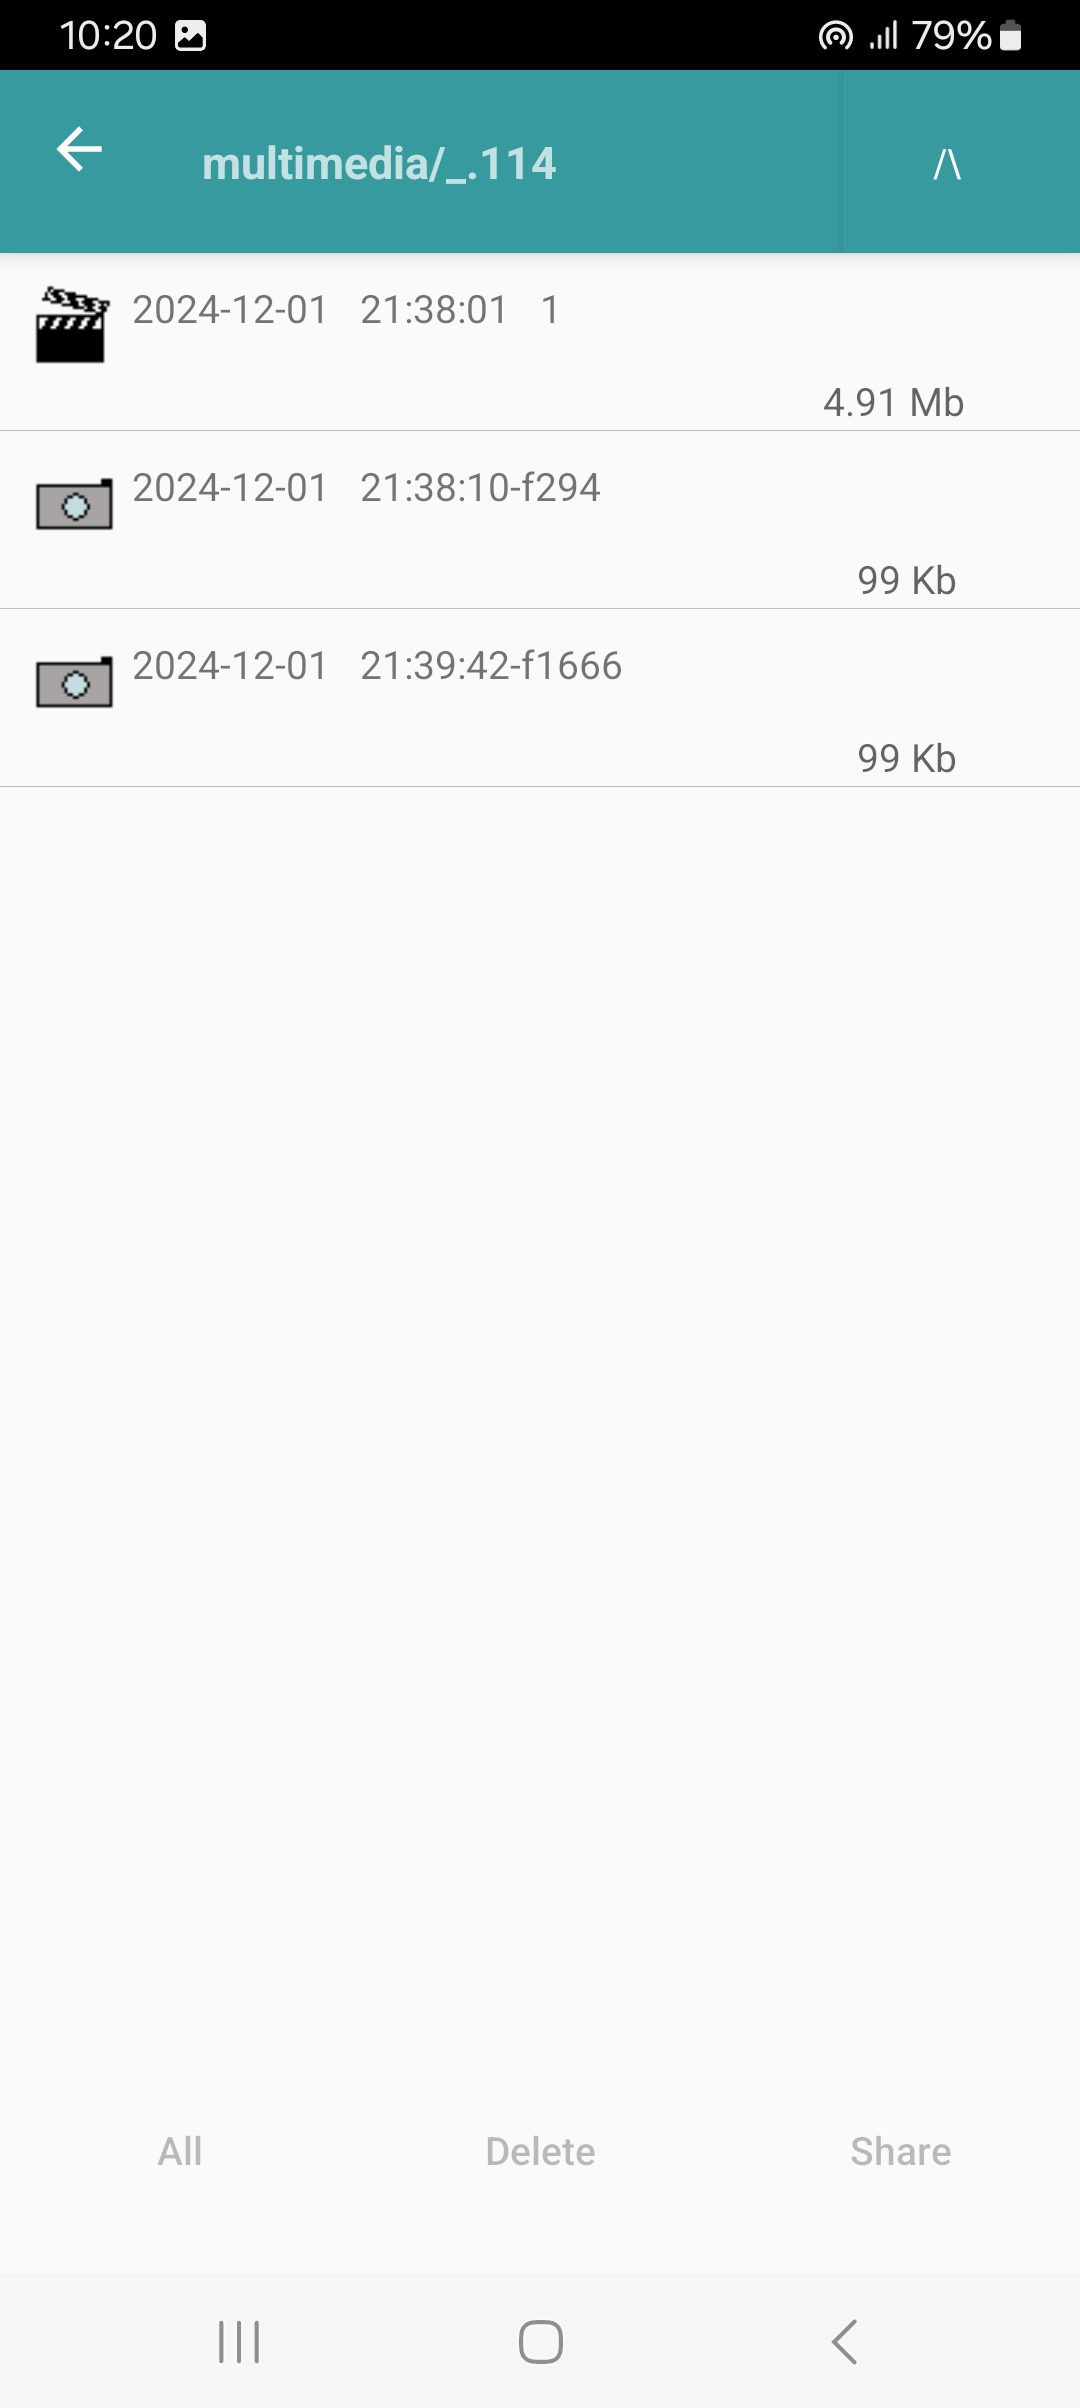
Files are reachable in the "Files" mode through the "open" (frames-collection files are also reachable in the "File sender" mode through the "Select file" button). Files are organized in the following directories:
- frames, where any result of the recording activity is saved as a frames collection file
 .
Actually any row in this directory might represent more than one file:.
when the watching device changes orientation (during transmission), recording (on the receiving side) creates one more file. The scene in each of these files is straightened, to get it ready for reproduction.
For keeping management of these groups of files easy, one only row is used to represent them within the file browser:
the composition of the group of frames-collection files can be discovered looking at the right side of the row, where the file quantity and the overall size
of the group is written. (note: in this guide "frames-collection file" is used in place of "group of frames-collection files composing a recorded
scene", for brevity).
.
Actually any row in this directory might represent more than one file:.
when the watching device changes orientation (during transmission), recording (on the receiving side) creates one more file. The scene in each of these files is straightened, to get it ready for reproduction.
For keeping management of these groups of files easy, one only row is used to represent them within the file browser:
the composition of the group of frames-collection files can be discovered looking at the right side of the row, where the file quantity and the overall size
of the group is written. (note: in this guide "frames-collection file" is used in place of "group of frames-collection files composing a recorded
scene", for brevity). - multimedia, containing the files that can be shared with the outside, where two types of file are stored:
- jpg files
 , resulting from snap-shots performed during the observation of the incoming streaming
and from the "Save frame" action performed during the use of the frame viewer by which the user has opened a frames-collection file
, resulting from snap-shots performed during the observation of the incoming streaming
and from the "Save frame" action performed during the use of the frame viewer by which the user has opened a frames-collection file - mp4 files
 , generated by the app when the user selects some frames-collection file and touches the "->Mp4" button.
- jpg files
- imported frames, containing the frames-collection files received by means of the Receiving a frames-collection file operation. Note that the subfolder where the received item is stored, is named as the source device of the sending operation (different from the name of the possible sub-folder where the item could reside in the source device).
- multimedia archive, analogous to the "multimedia" directory but where:
- jpg files result from frame saving made during the use of the frame viewer, when the viewer is working on a file located in the "imported frames" directory
- mp4 file are generated in a quantity that depends on the composition of each group impersonated by the source items visualized within the "imported frames" directory: one mp4 file for each group component.
- local recordings is the container for files created by the Local recording.
- downloads It is where the frames-collection files downloaded during a remote desktop session, are located.
Each directory can be entered by touching its row and exited by means of the left arrow located at the top-left corner of the screen.
Each of the directories is then structured in subdirectories named with the name of the device the contained files come from.
The name of each file is set as follows:
- for a frames-collection file is the local-device date-time, corresponding to the "start of recording" event. The format is YY-MM-DD hh:mm:ss
- for .mp4 files the name matches that one of the source frames-collection file with a cardinality index appended, because the source item might carry a set of different contributions, one for each rotation happened during the capturing.
- for .jpg files generated by snap-shots, the name is the local-device date-time too, but, in addition, cents of seconds and the frame native count are appended. The name format is, therefore: YY-MM-DD hh:mm:ss.cc-fn where 'n' is the native count as not formatted integer.
- for .jpg files coming from the Frame viewer, the name is the frame date-time, computed on the basis of the date-time expressed by the frames-collection name from which the frame was picked up, plus the frame timing. The format is YY_MM_DD__hh-mm-ss-fn where 'n' is the native count.
Files extensions are hidden to the user.
Inside each of the directories a sort button ("/\", "\/") is available at the top-right corner of the screen.
Operations on files
A touch action produces a different effect on each item type:
- a touch on a directory make the user enter the directory
- a touch on a frames-collection file opens the built-in frame viewer.
- a touch on a jpg file lets the user view it. During the viewing:
- an horizontal swipe action drives the user to the next/previous image present in the same directory
- a simple touch on the image content enters/exits the full-screen mode
- a touch on a mp4 file lets the user play it. During playing a simple touch hides/recalls play controls.
A touch on the left arrow ("<-") located a the top-left corner of the screen, exits the view or goes one level up in the file tree.
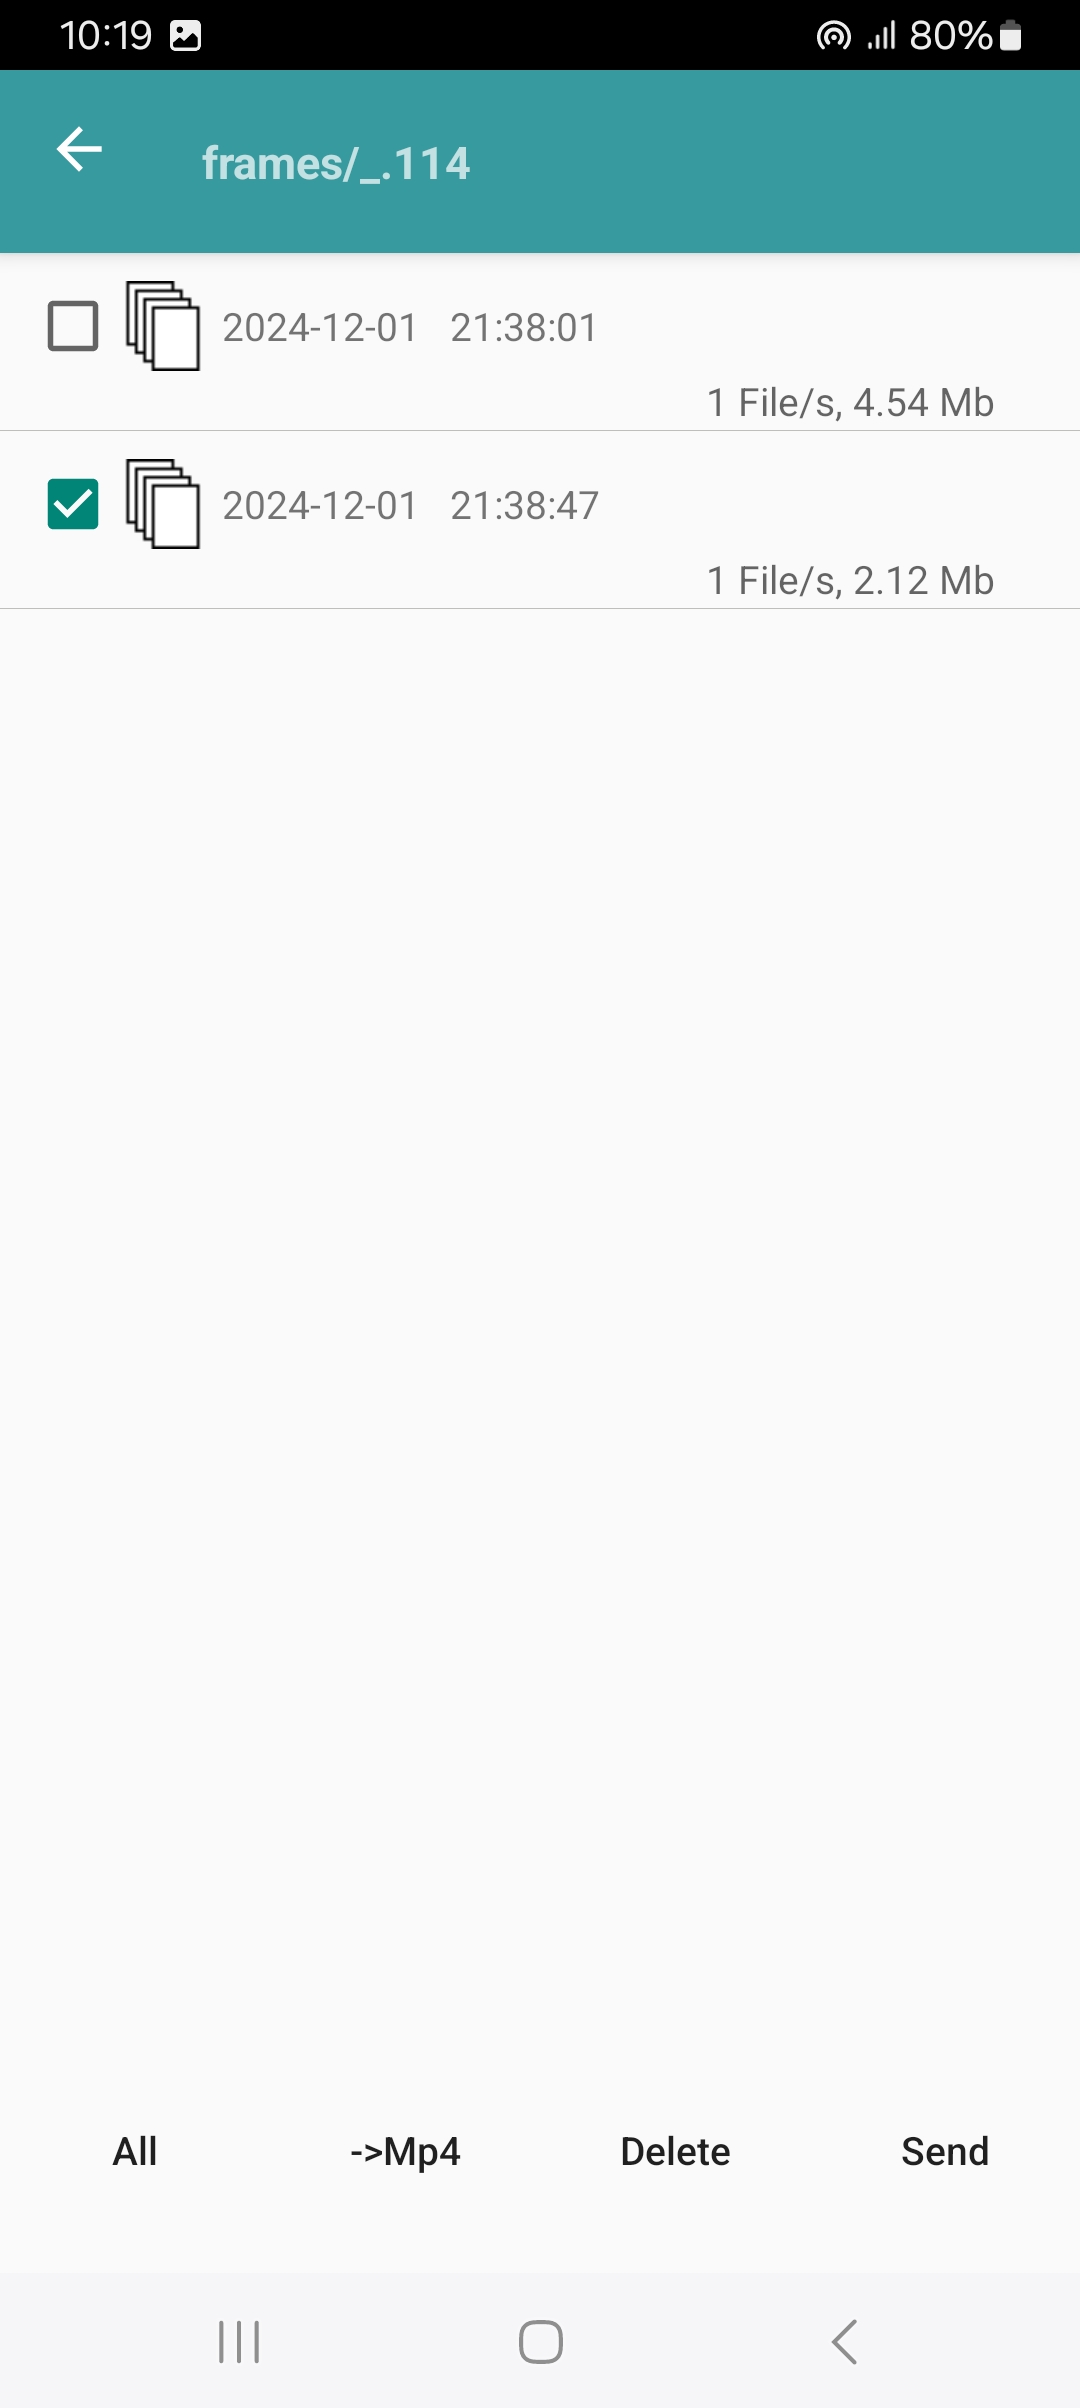
Each item is also target of at least one further operation; for that to occur, the item needs to be selected:
to enable item selection the user needs to make a long touch on the file view (another long touch disables item selection - a touch on the left arrow leads to the same result).
Once items have been selected the user can see the applicable commands at the bottom of the screen.
Files are not movable within the local file-system but can only be deleted.
Media files can be shared using the available O.S. facilities.
Frames-collection files can be used as a source for building mp4 files and can be sent to any "GetMyPov partner".
Sending a frames-collection file
- In the "Files" mode, that is, by relying on the automatic discovery of the partner, and accessing the file to send by means of the "Open" button. This requires the partner to start listening for receiving, by using the same "Files" mode
- In the "File sender" mode, that is, by relying on connection data stored in the connection database and by selecting the local or 'public' server to connect to, then by accessing the file to send by means of the "Select file" button. This requires the partner to start listening for receiving, by using the "File receiver" mode. Make sure that one and only one partner is listening for receiving a file.
There are two options to do this:
Note: Only one file at a time can be sent.
Once the file has been selected inside any directory different from the "multimedia..." ones, the command "Send" at the bottom of the screen makes the app enter in a 'waiting for sending'" state, and an empty progress bar appears inside the row associated to the previously selected item.
When the sending process starts the user can see either the progress bar starting to fill or the "File" specification on the left side of the row with the index and the size of the file that is currently being sent. The progress is rendered for each component of the group associated to the selected item.
The operation is interruptable at any moment with the available "Cancel" command.
Warning: the transfer removes, without notice, any possible file located in the destination, having the same name of that one being transferred.
Note: upon interruption of the transfer the app leaves any partially transferred fragment on the destination because it is a partial but coherent collection of frames.
Generating sharable video files (mp4 files)
At the user interface level this operation is similar to sending files but, here, more than one file are selectable at a time.
So that, when the process starts, the user can see all the selected rows to behave with their specific progress scene.
The command for this operation is ->Mp4.
For each processed row a number of mp4 files are generate, corresponding to the quantity of files composing the source group represented by the row itself. The name of each mp4 file takes the same name of the frame-collection group, and has a scene progress index (N) appended, as in the following format: YY_MM_DD__hh-mm-ss__N.
Warning: the generation removes, without notice, any possible file located in the destination folder, having the same name of that one being built.
Note: upon interruption of the generation the app deletes any partially built fragment because not saved in an consistent way.
Sharing a multimedia file
Only one multimedia file at a time is shareable. Once the item has been selected the command to be used is "Share".
The Frame viewer
By making a touch on any frames-collection file row, the user gets the frame viewer opened on the first file (that might be the one only file) of the underlying group.
A frames collection item can be viewed:
- frame-by-frame
- with animation
- by moving the dedicated sliding progress bar
In the first two cases the viewing proceeds like all the files of the group were a unique file.
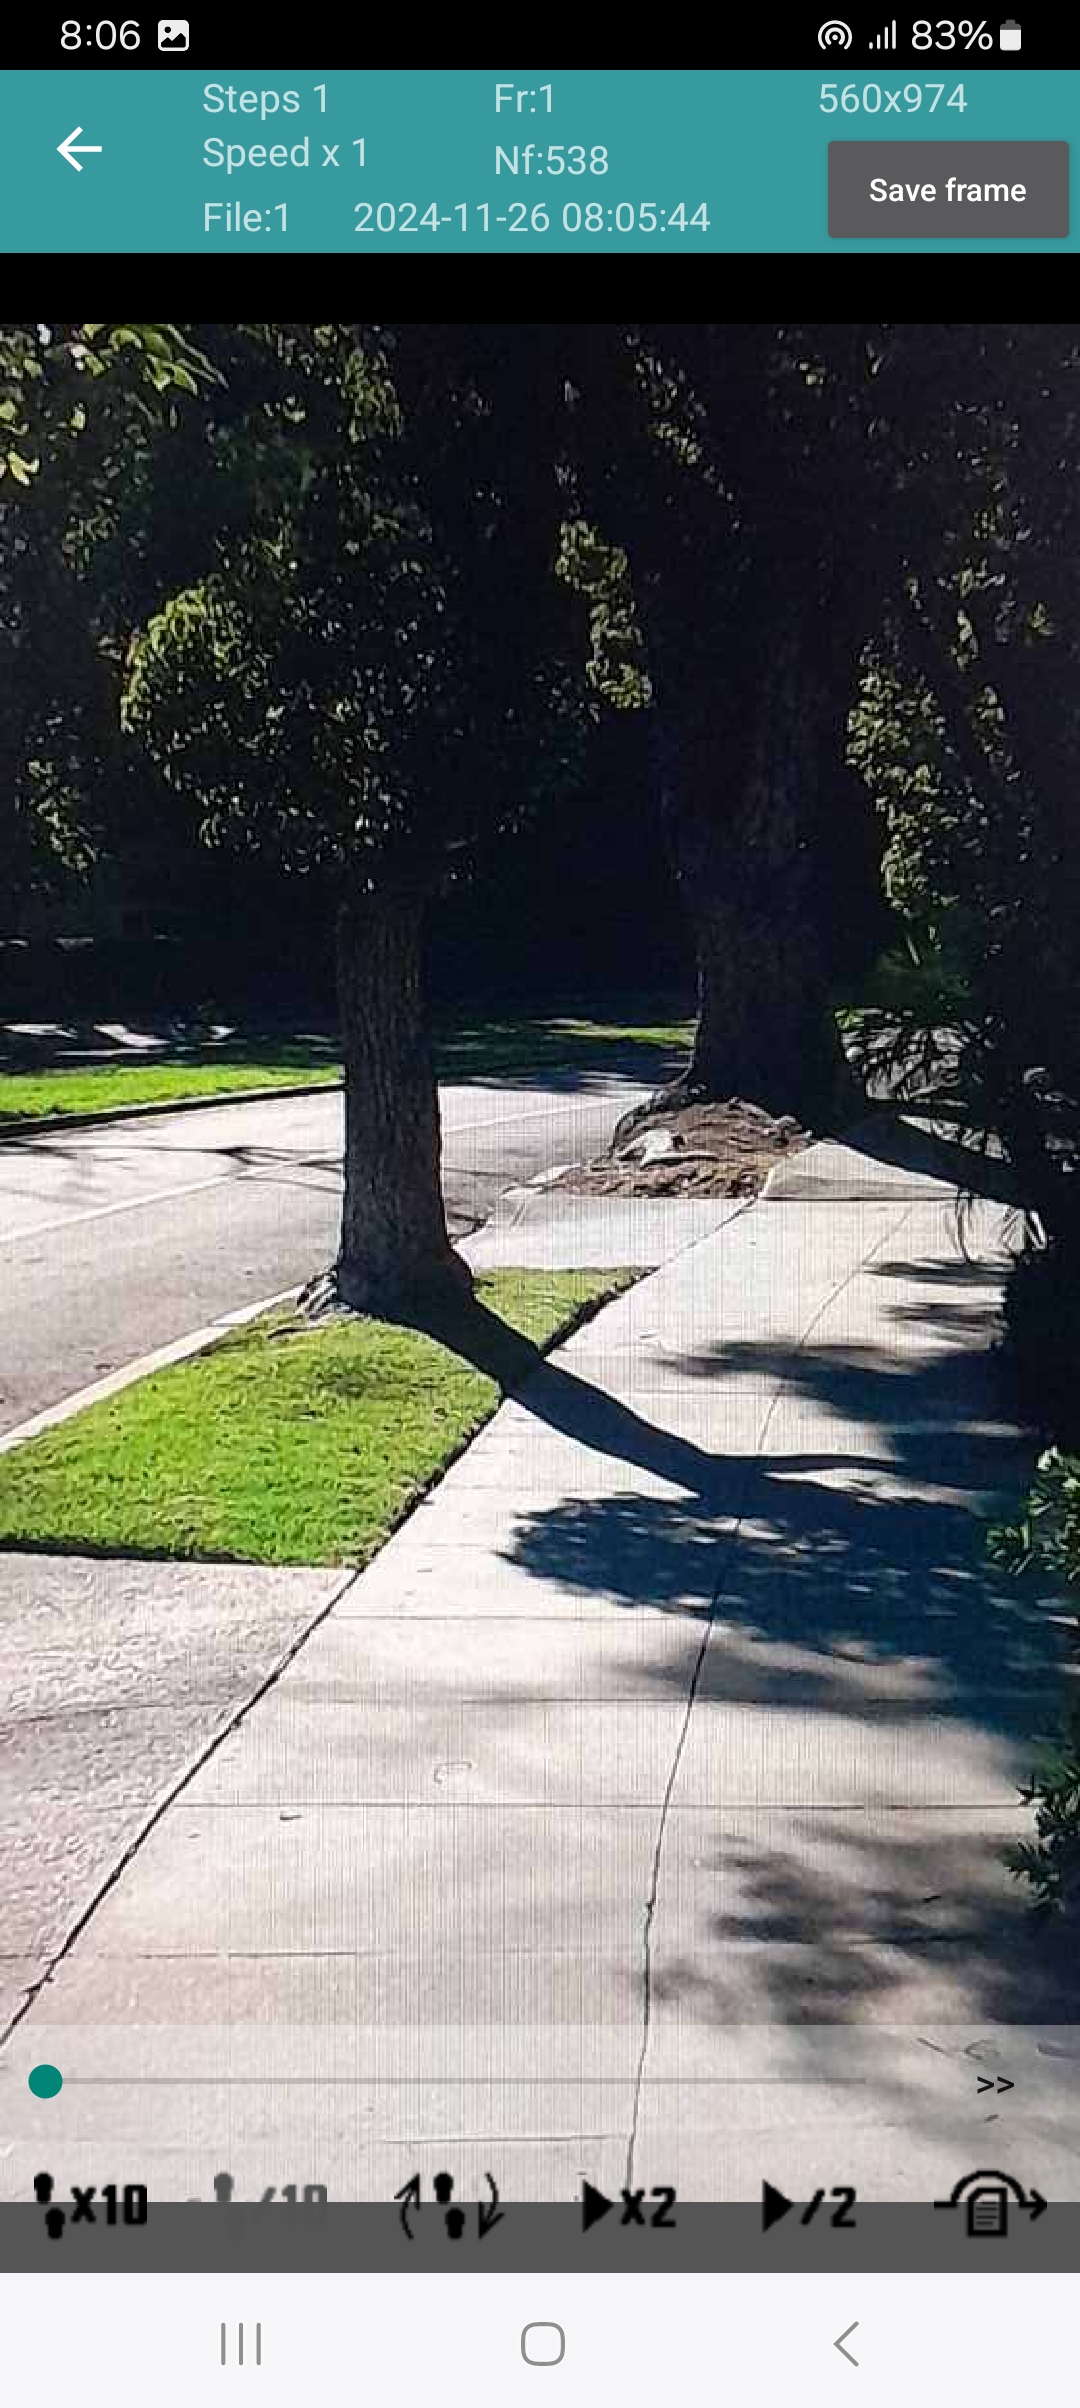
In all modes of viewing, in the heading part of the viewer, both the current native count (Nf) and the date-time associated to each frame are shown.
Frame-by-frame viewing is performed by making a touch on the scene for every ongoing step that is desired. The 'next' frame depends on the steps quantity set. By default, after the opening, this value is set to 1, that is a touch leads to the frame that follows the current one. The user can change this value through the buttons located under the visualization area:
 : its appearance informs on the current direction for proceeding and, when touched,
it reverts this direction.
: its appearance informs on the current direction for proceeding and, when touched,
it reverts this direction. : it multiplies the step dimension by 10.
 : it divides the step dimension by 10.
The reverse direction for proceeding corresponds to negative values of the "steps" quantity. If the "next" frame position, determined by the current "steps" value, does not fall within a file of the group, the viewer exits.
At any position, the "Save frame" button, at the top-right, saves the frame as jpg file in the "multimedia" directory or in the "multimedia archive" directory depending on whether the opened frames-collection file resides in the "frames" directory or not. The name used for the created file is the frame date-time, displayed at the top, with the native count appended like in the following format: YY_MM_DD__hh-mm-ss-fn (note as this format allows to distinguish frames saved by the viewer from frames produced by snap-shots: here no cents of second occur).
Animated viewing can start by touching the ">>" button located at the bottom-right corner of the viewing area. The viewer exits when the collection ends. In any moment the user can stop the animation by simply touching the moving scene.
Animation speed, by default "natural", can be modified by means of the following buttons:
 : it multiplies the speed by 2.
 : it divides the speed by 2.
Viewing by moving the bar
It is possible to get a continuous animation analogically correspondent to the movement of the finger on the bar, but only in forward movements.
The backward sliding performs the scene regression associated to the target position only on the release of the touch.
Other features of the viewer
The "skip file"  button located at the bottom right corner lets the viewer to reach the next file in the group.
For the button to be available it is required that the "steps" value be positive.
button located at the bottom right corner lets the viewer to reach the next file in the group.
For the button to be available it is required that the "steps" value be positive.
Viewing in full-screen mode is then another possibility: a long touch on the viewing area switches the viewer into the full-screen mode and another long touch recalls the normal mode. Full-screen is supported in all the viewing modes described above.
At last there is the availability of the zoom either in static viewing or with the scene in motion.
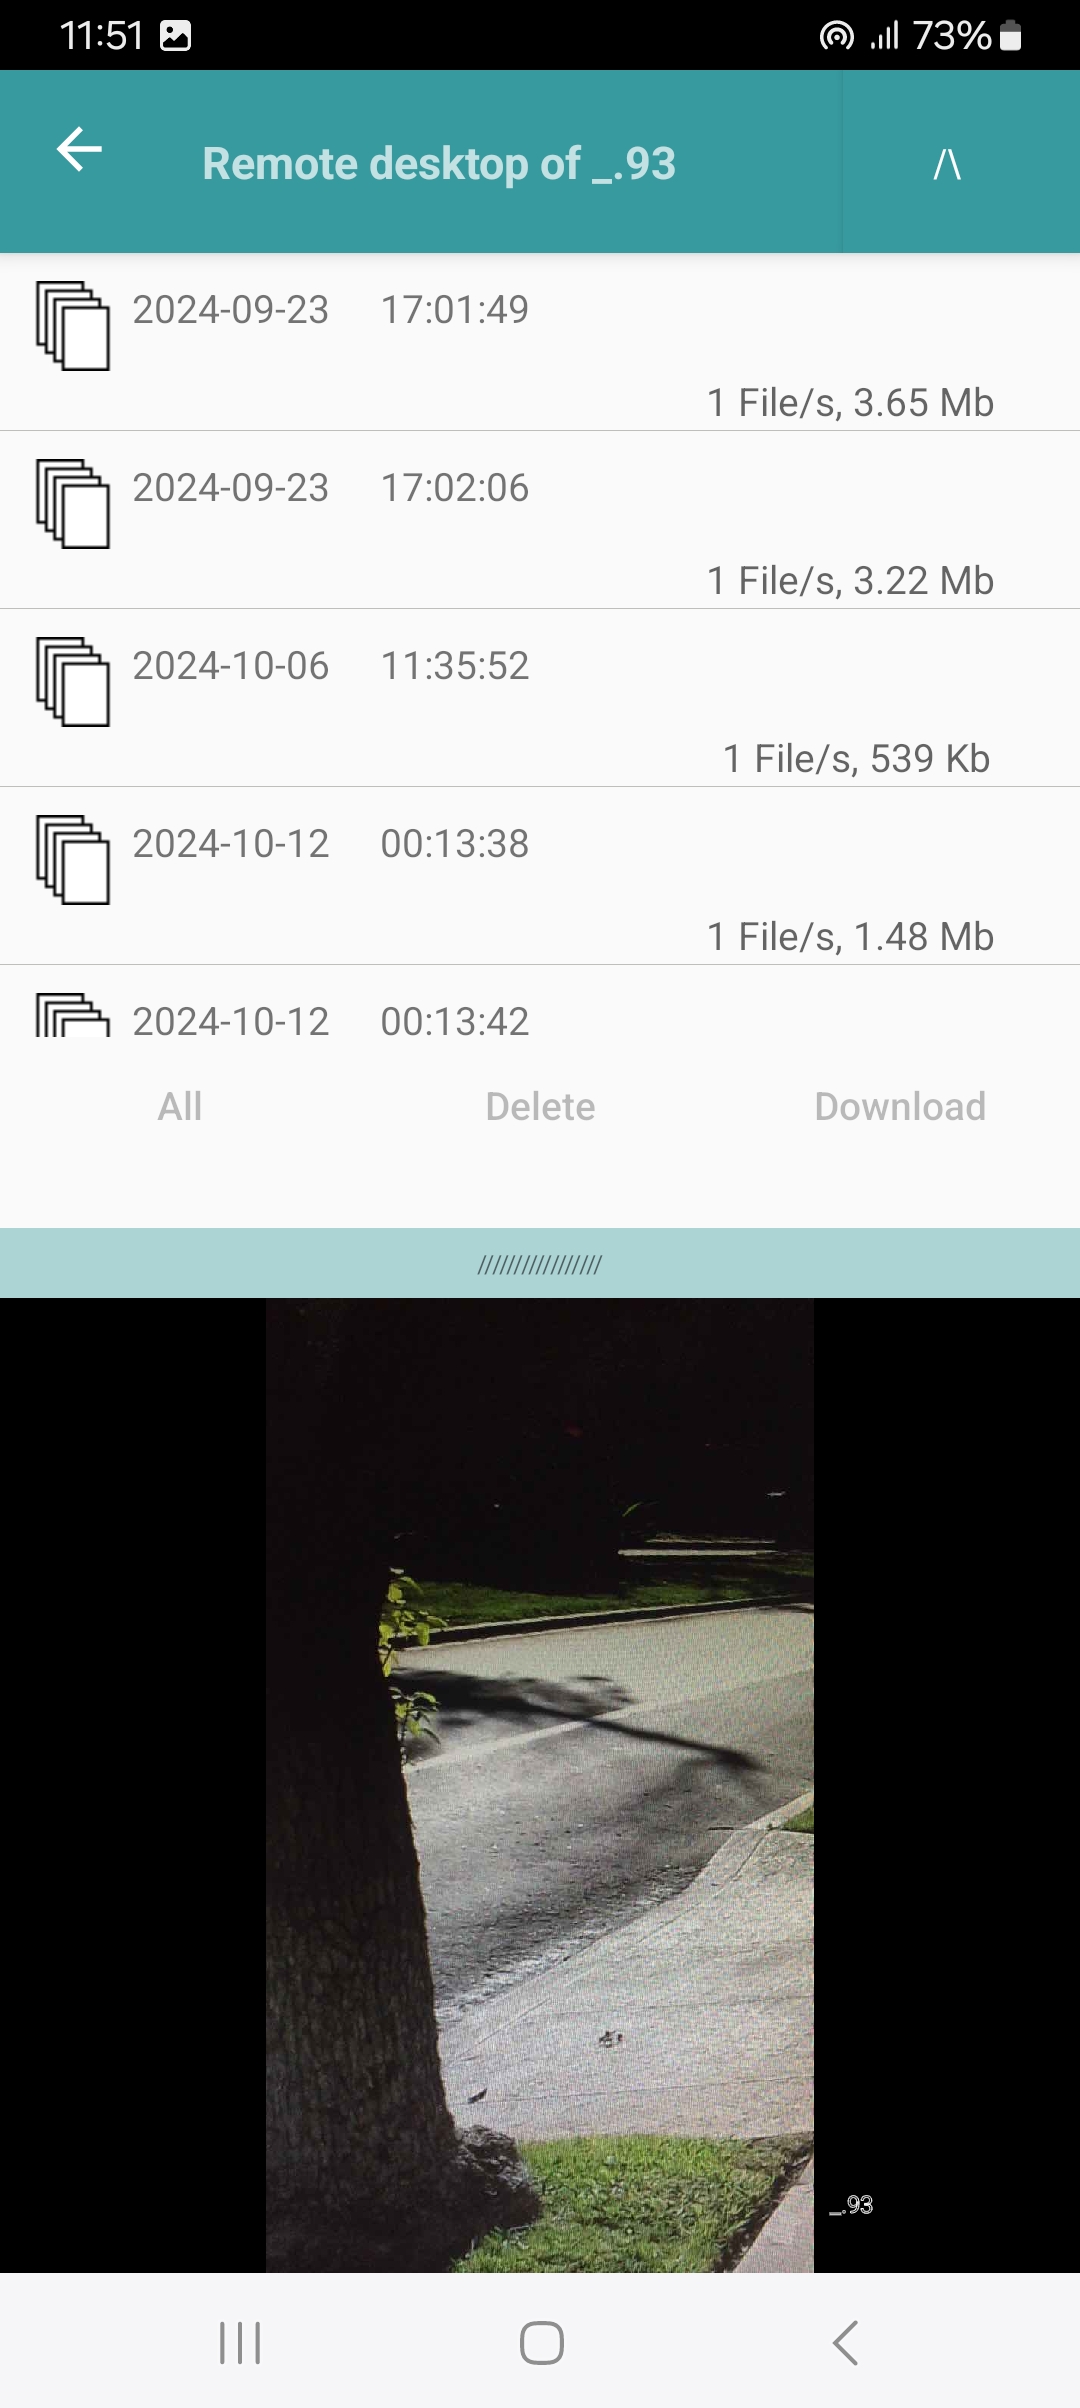
Remote desktop
When the smartphone behaves as receiver the "Remote device" section is present in the panel and in the case the smartphone has 'total' control on the transmitter, this section provides the Desktop button, that is the gate to the access to the remote desktop of the transmitter
Here this expression means the access to the part of the remote file-system made by the frames-collection files resulted by "Recording on place" operations, that means recordings activated by the Record on place button of this receiver, or as effect of the preset of the Recording checkbox located in the "This device" section of the transmitter. In other words all recordings residing in the transmitter "locally-recorded" folder since made by the transmitter using its own camera.
Touched the 'Desktop' button the user is asked whether to leave incoming streaming turned on. A negative answer leads to the suspension of the camera session on the transmitter and the presentation of the remote desktop that fills the entire page. A positive answer leads to the presentation o a page split in two regions where the upper one contains the remote desktop and the lower one the drawing of the incoming streaming.
Whatever the user's answer be, at the bottom of the remote desktop region there is a light green strip that allows, by doing a touch on it, to switch between the split page and the entire one and viceversa.
If the user initially answered 'No', a touch on the strip triggers the 'resuming from suspension' process that takes a few seconds to complete.
The remote desktop region has the same user interface as the access to the local files with the following differences:
- only one level of file-system is browsable - that one of the frames-collection files which we are interested in
- commands here are "Delete" and "Download", both allowing a multiple selection.
- A touch on the left arrow ("<-") located a the top-left corner of the screen, terminates the remote desktop session.
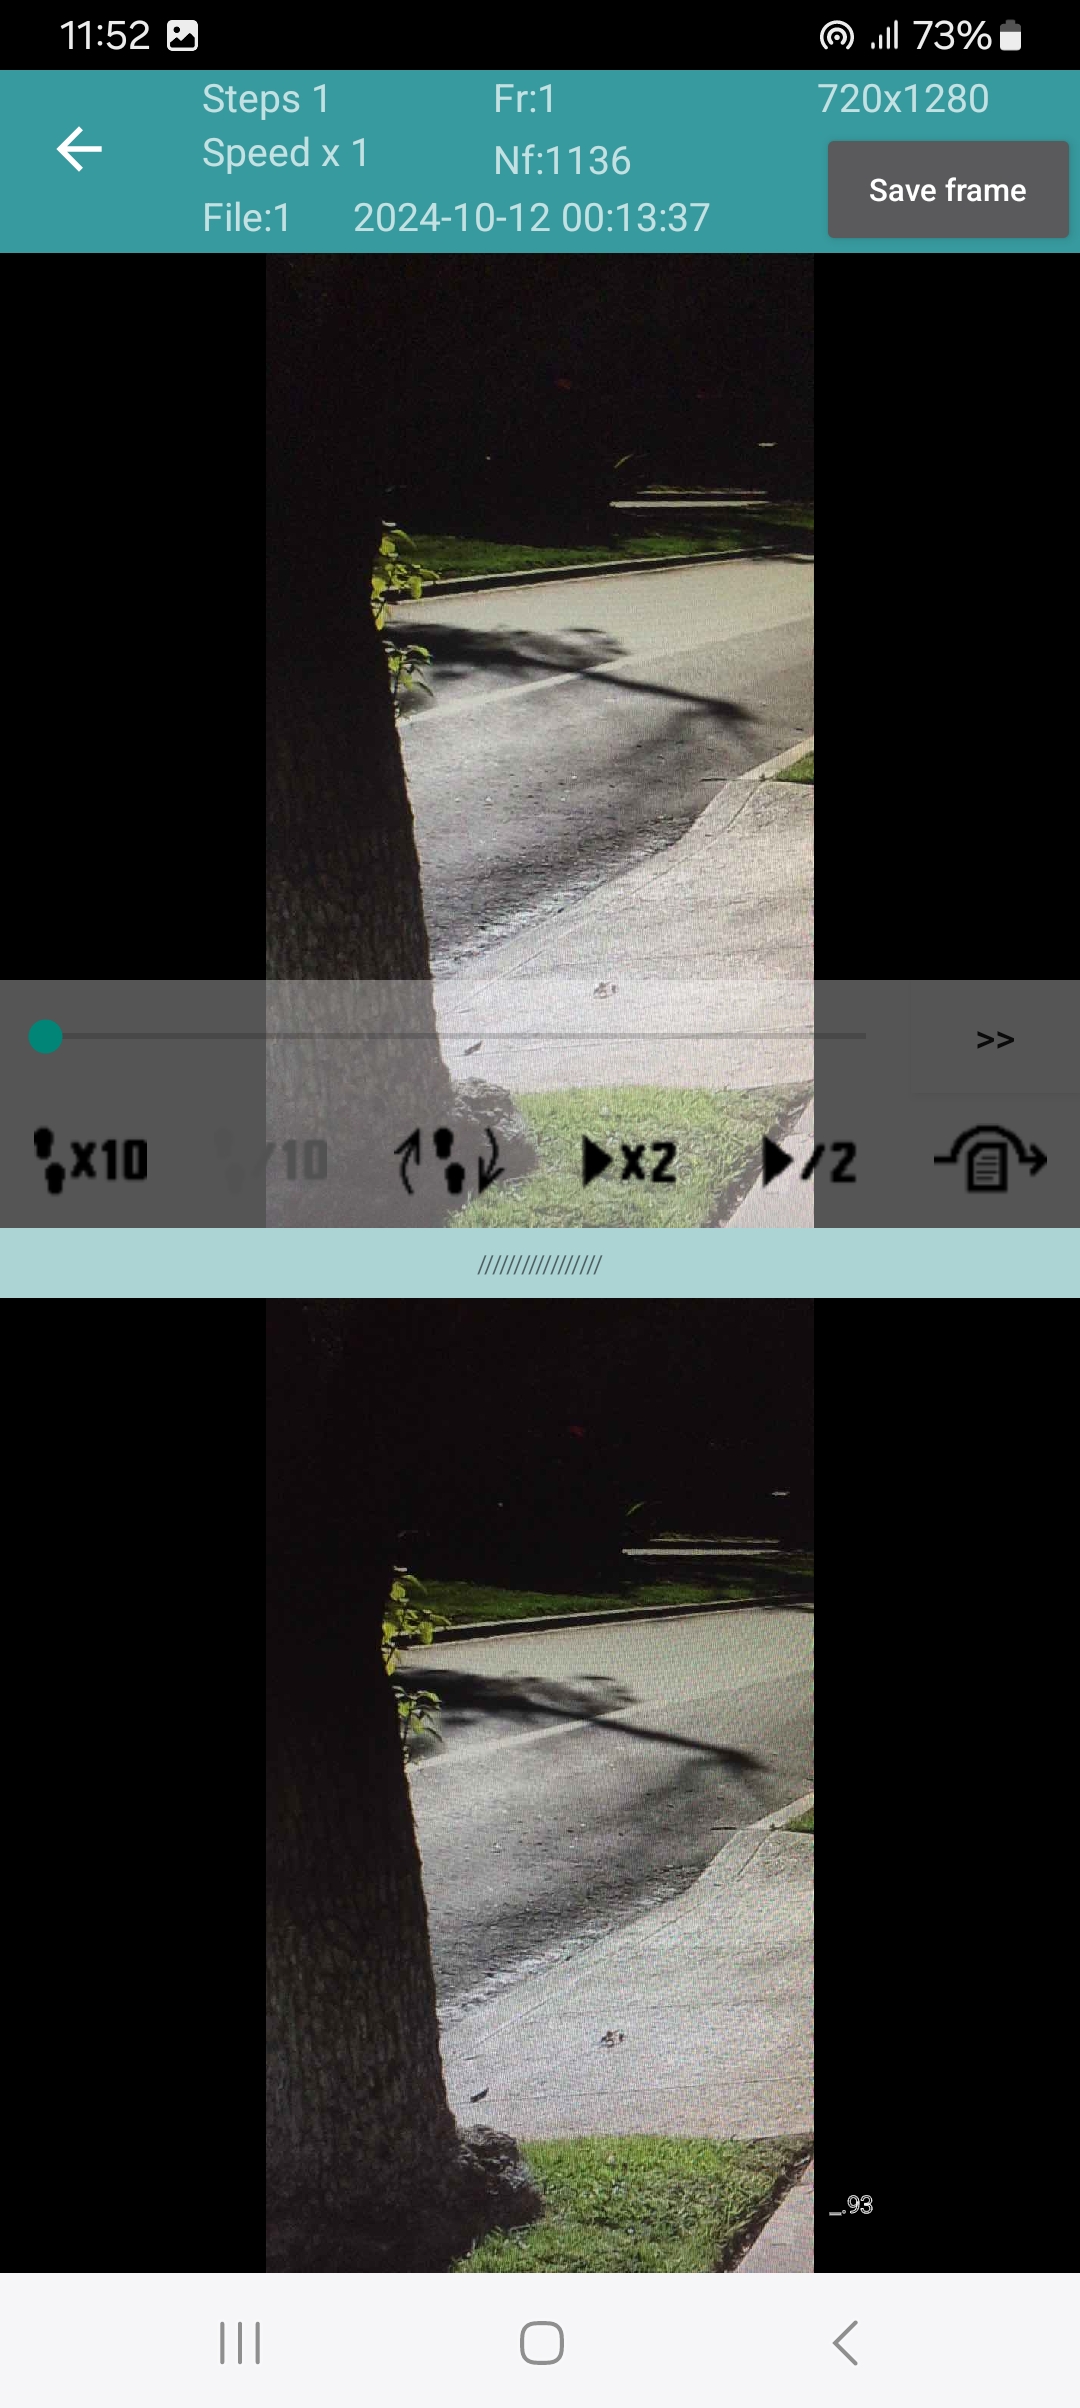
Each file can be, even here, viewed (directly) by means of the the Frame viewer with all features available there, taking into account that the file access is not local. (Note: here, if you touch the 'Save frame' button the frame is saved in the 'multimedia' folder, in a sub-folder named as the transmitter with '_localRec' as ending part).
App settings
Reached from the main panel (in idle state) the Settings view makes the following options available:
- the optional (but advisable) name that, when transmission is performed, appears on the other side either during observation or to locate the recorded files in the tree of the private file system (actually this name is got by the other side also when this device send a frames-collection file). If this field is left empty, a name surrogate is created for this device as the concatenation of "_" and the ending part of the IP address (be it IP4 or IP6).
- the Connection password to be shared with "the remote side"
- the Camera options:
- The Remotely controllable switch, enabled by default, when deselected, states the device authority to avoid any form of control by other partners, no matter of their relation with this device and their position in the family.
- Image quality expressed as a percentage value, is related to the rate of compression applied to each frame.
- Image quality II, available only to GetMyPov h, as a second value to be set independently
- the Rate of use for forwarding expressed as 1 in N frames. The default is 1 in 1, that is all the frames are processed and forwarded.
- Motion insensitivity operates when the "Only motion" or "motion follower" attributes are set, and makes the motion harder to detect. The default value is zero.
- Motion sustain also operates when the "Only motion" or "motion follower" attributes are set, and is a delayer applied to the time the system switches to the "no motion" state, after any motion ended in the scene. It is expressed in seconds and its default value is 5. Note that low values of this option, in recording, can produce undesired fragmentation in the saved files.
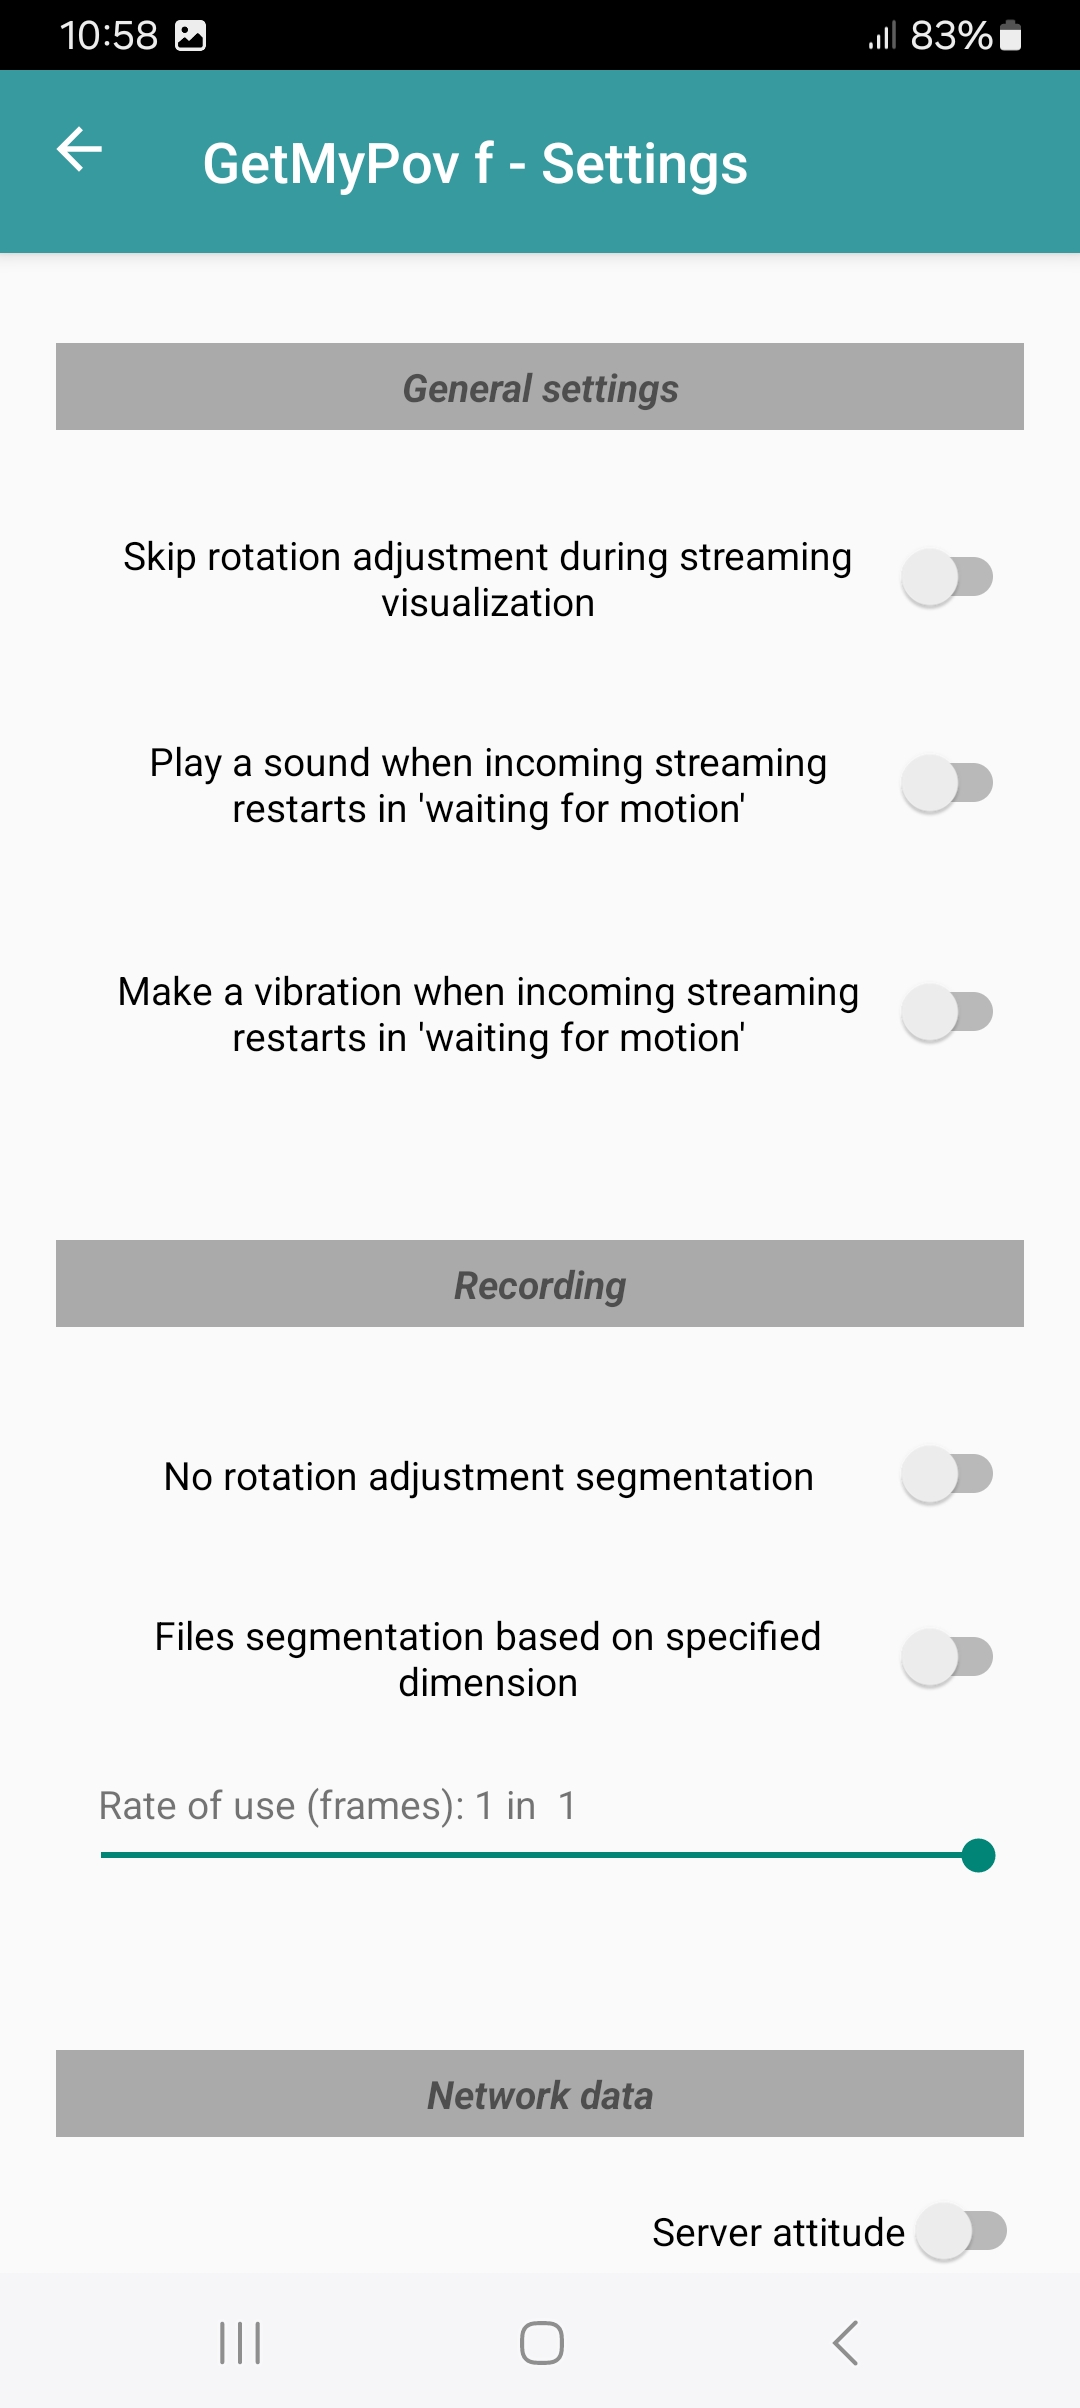
- General settings
- Skip rotation adjustment during streaming visualization allows to follow the remote scene "in the hard way": without rotation compensation. It has no effect on recording that depends on an attribute specifically dedicated (see below).
- Play a sound when incoming streaming restarts in 'waiting for motion', that is, when, after a period of time in which the system stayed in the "Waiting for motion" state with no incoming streaming, since the watcher was in the no-motion state, the incoming streaming starts flowing again.
- Make a vibration when incoming streaming restarts in 'waiting for motion' does not require further explanation, therefore.
- Recording
- No rotation adjustment segmentation states to record the incoming streaming in a unique file, no matter of the orientation of the remote device, instead of the "normal" scheme where many files are generated, one more for each change in orientation of the remote smartphone.
- Files segmentation based on specified dimension sets the maximum size a file produced by recording can reach, before another one is created to continue the writing on the storage support. When enabled, the child attribute Max file dimension is visible. It ranges between 1 and 4096 Mb progressing as a power of two for allowing a comfortable setting. Its default value is 4.
- Rate of use also refers to recording: it sets how many frames are actually recorded among all the effectively existing ones inside the incoming streaming. It is expressed as 1 in N frames and the default value is 1 in 1: all the received frames are recorded.
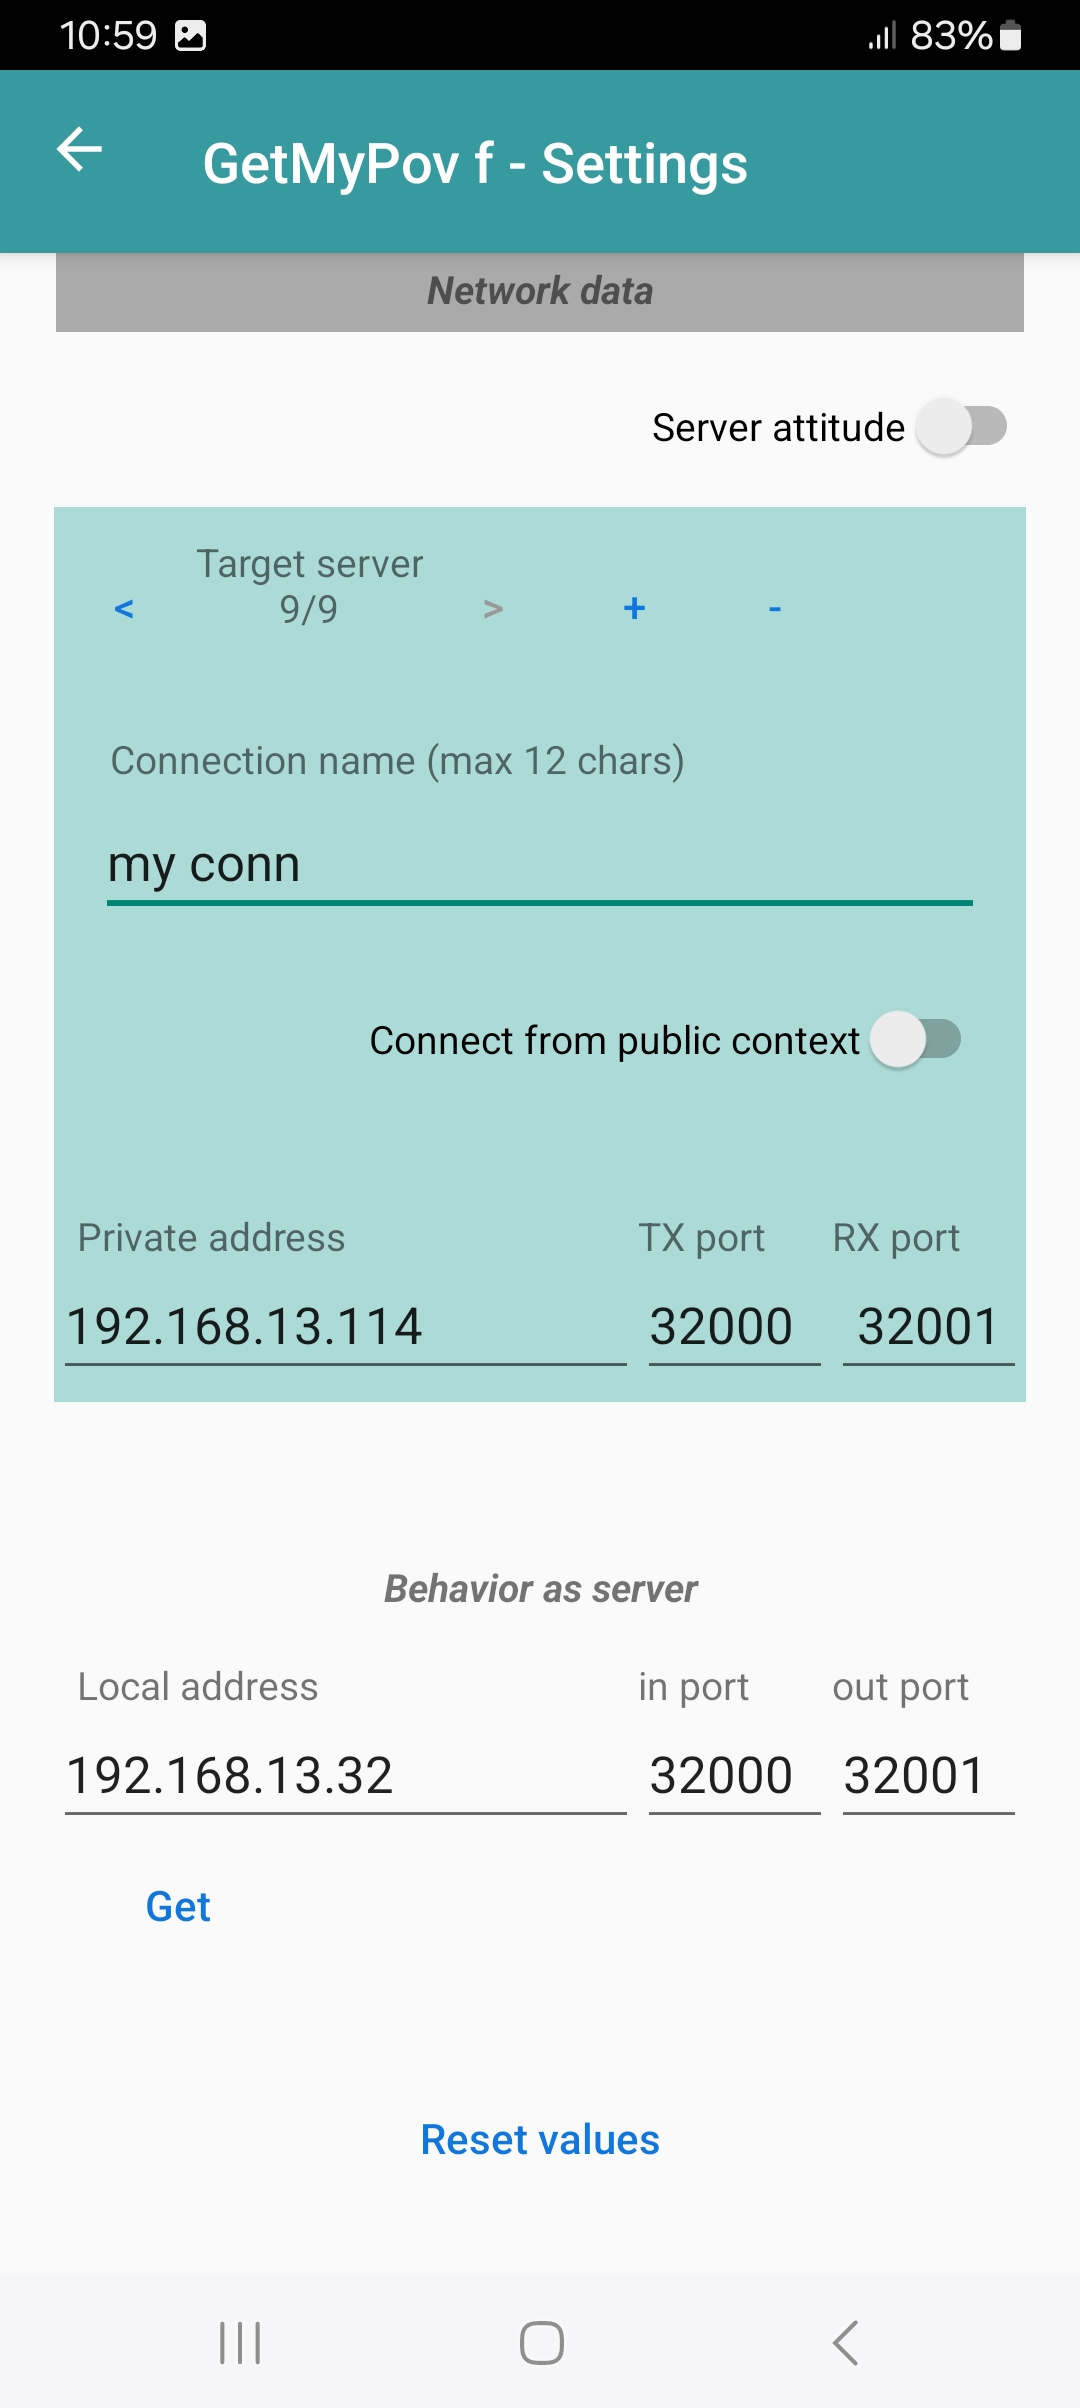
- Network data
- The Server attitude switch, available only in GetMyPov f / GetMyPov c, increases the priority of this device to behave as network server in the app modes ('Auto' and 'Remote recorder') that perform a negotiation to get this role.
- The Connections database.
It is accessible inside the green region and is useful to keep track of partners network data, both in the local context and in the public one.
It is maintained either manually by classical editing actions or by the activity performed in the "Only discovery" mode. It is fed even during any session that makes use of automatic discovering of partners.
Its records are used by every app mode that does not make use of the automatic discovering of the partners.
Adding and deleting a record are possible operations by means of "+" and "-" buttons.
Port default values are suggested in record creation taking into account port default values of servers - see 'Behavior as server' section below - 'TX' means the target server port used to 'transmit' video streaming to that server, RX means the target server port addressed to 'receive' video streaming from that server.
Only available in GetMyPov h, the Enabled switch, when disabled, allows to prevent the record from being used. The app uses only the enabled records, to perform its capability to sustain many connections, when it does not rely on the automatic discovering of partners.
The Connect from public context switch defines the place holder for a public address and ports, that, as such, identifies a connection over the Internet.
Syntactic and semantic check is performed on the entered data: only private and link-local IP addresses are admitted in the local context and only public IP addresses in the public context.
When Connect from public context switch is set, the data connection is used for looking for an access to Internet: the Through Wi-Fi switch is available to change this configuration.
Each record hosts both the local context and the public one, so that the two contexts share the same connection name. The selection state of the Connect from public context switch identifies which of the two addresses is used when the record is referenced by the app. (This double definition might be of some help when a target server is addressed some time from the local context and some time from the public one: the simple switching of context, operated here in the setting on the record associated to that particular target, performs all that is needed to do.)
- Behavior as server are data used when the device is in some way accessed as network server. Ports are settable and their default values are: 32000 for incoming streaming, in the network server, and 32001 for the outgoing' from it. Network address is not settable by the user but updatable by means of the "Get" button, since it is a value assigned by the router present in the local network.
- Language selection
- All apps have support for the following languages:
- English
- Italian
- German
- French
- Spanish
- Brazilian
- Ukrainian
Furthermore the user here can restore either numeric values or the app suggestions mechanism to the factory scheme.

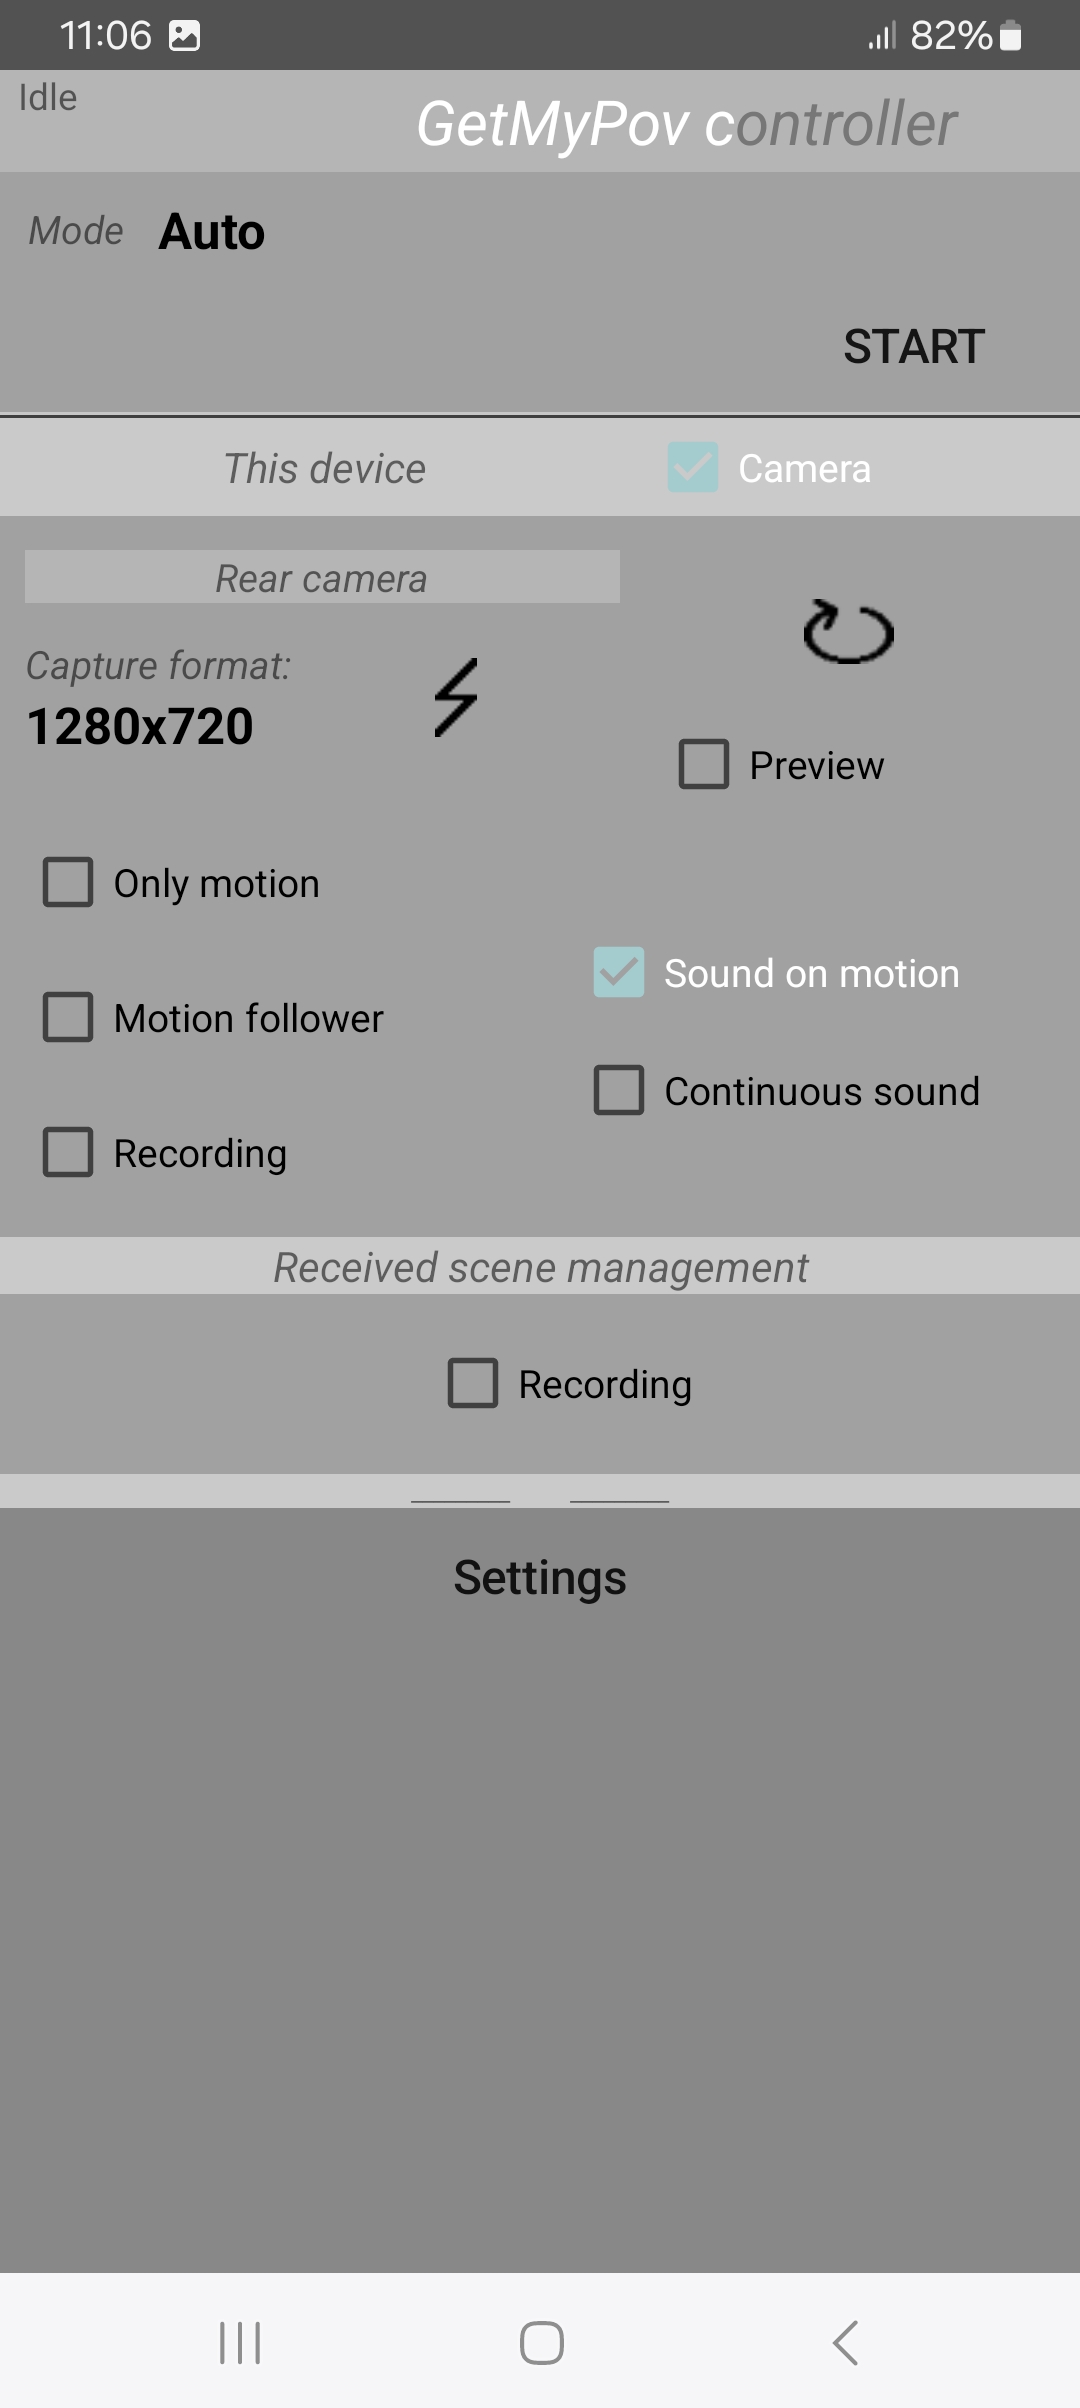
GetMyPov f / GetMyPov c - Specific features
The specific app modes
All of the following modes prepare the device to get a connection to a partner, just after the "Start" event or at most, after the choice of a subsequent option:- Auto
It turns the partners automatic discovery On. It is the simplest mode to use and to understand: the "Camera" checkbox enable the configuration section and the use of the device cameras for video streaming transmission. If de-selected the device, on start and connection to the found partner, will expect the partner to provide a video streaming. If this does not occur the session will automatically stop. In the 'Settings' view, the "Server attitude" switch makes the device to have more chances to become a network server than the partner which it has the negotiation with. - Camera server
It makes the following settings:- camera: On
- network role: server
- automatic discovery: On
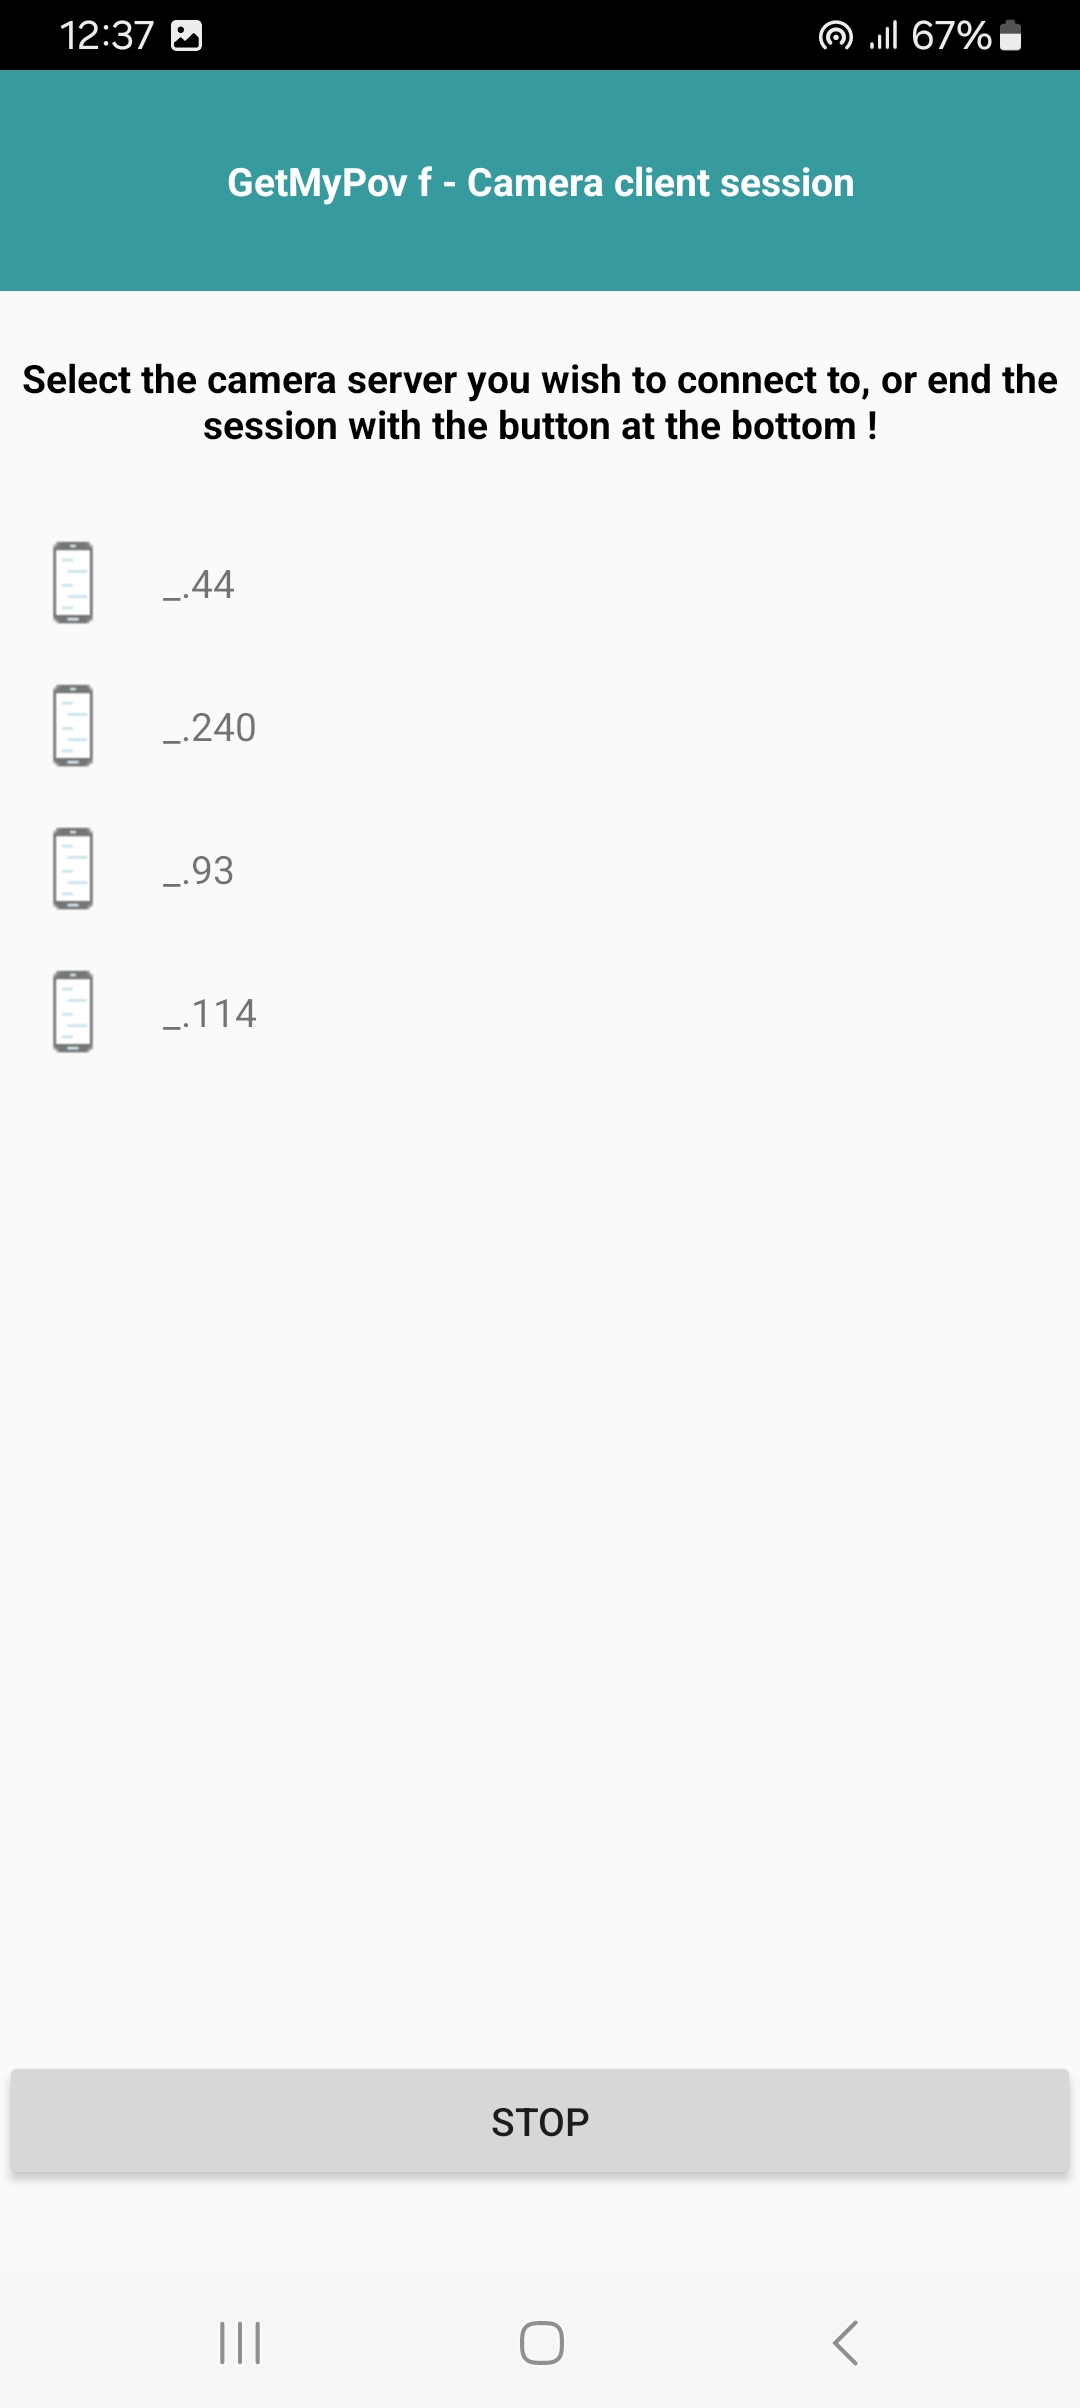
- Camera client
It prepares the device for exploring the local network, with the automatic discovery process, in order to produce a list of the 'discoverable camera providers' (all the app - 'GetMyPov f' and 'C' - instances that are running with the camera activated and that have the automatic discovery feature enabled).
So the user can touch each item to interact with it (control and remote desktop access included), finding it instantly reachable.
In order to terminate each interaction the user makes a stop in the operative panel so the app will go back to the list, allowing the user to try another camera server.
- Net server
It makes the following settings:- automatic discovery: Off
- network role: server
- Net client
It makes the following settings:- automatic discovery: Off
- network role: client
- Remote recorder
Beyond sharing the common features with H, here the mode activates always the automatic discovering of the partners and the network role of the device is determined exactly in the same way as in the "Auto" mode.
When a GetMyPov f / GetMyPov c device behaves as network server as a result of the negotiation performed in the "Auto" mode or because of the specific selected mode , a "(S)" symbol appears at the top-right corner of the panel, while when the role is reached because of the forcing action determined by the selection of the "Server attitude" switch, present in the Network data section of the Settings view, a ">S<" appears instead.
Two peers, obviously, cannot connect each other if both behaves as network servers.
GetMyPov c / GetMyPov h - Specific features
The Motion follower feature (Look at the short video)
This feature is applicable only when no zoom control action has been performed by any controlling partner and can be set locally by means of the "Motion follower" checkbox located in the "This device" section.
It can also be set by any controlling device through the command "Start following motion" located in the "Remote device section"
When active, it makes the app to perform automatic zoom-in operations on single moving objects that occupy only a part of the capturing area. As effect of the action, the processing area destined to local recording and forwarding activities is narrowed to a quarter or to a sixteenth of the whole capturing area, depending on the extension of the moving area.
Differently from the manual narrowing performed by the user, here, the motion detection mechanism keeps being applied to the entire capturing area, in order to detect the needs to go back to a larger processing area, to allow processing to catch further moving entities that could fall under the capturing area.
If the moving entity does not change its extension, from the point of view of the observer, but shifts within the capturing area, then the app stays at the same "zoom level" and "follows" the entity, shifting the watching subarea accordingly.
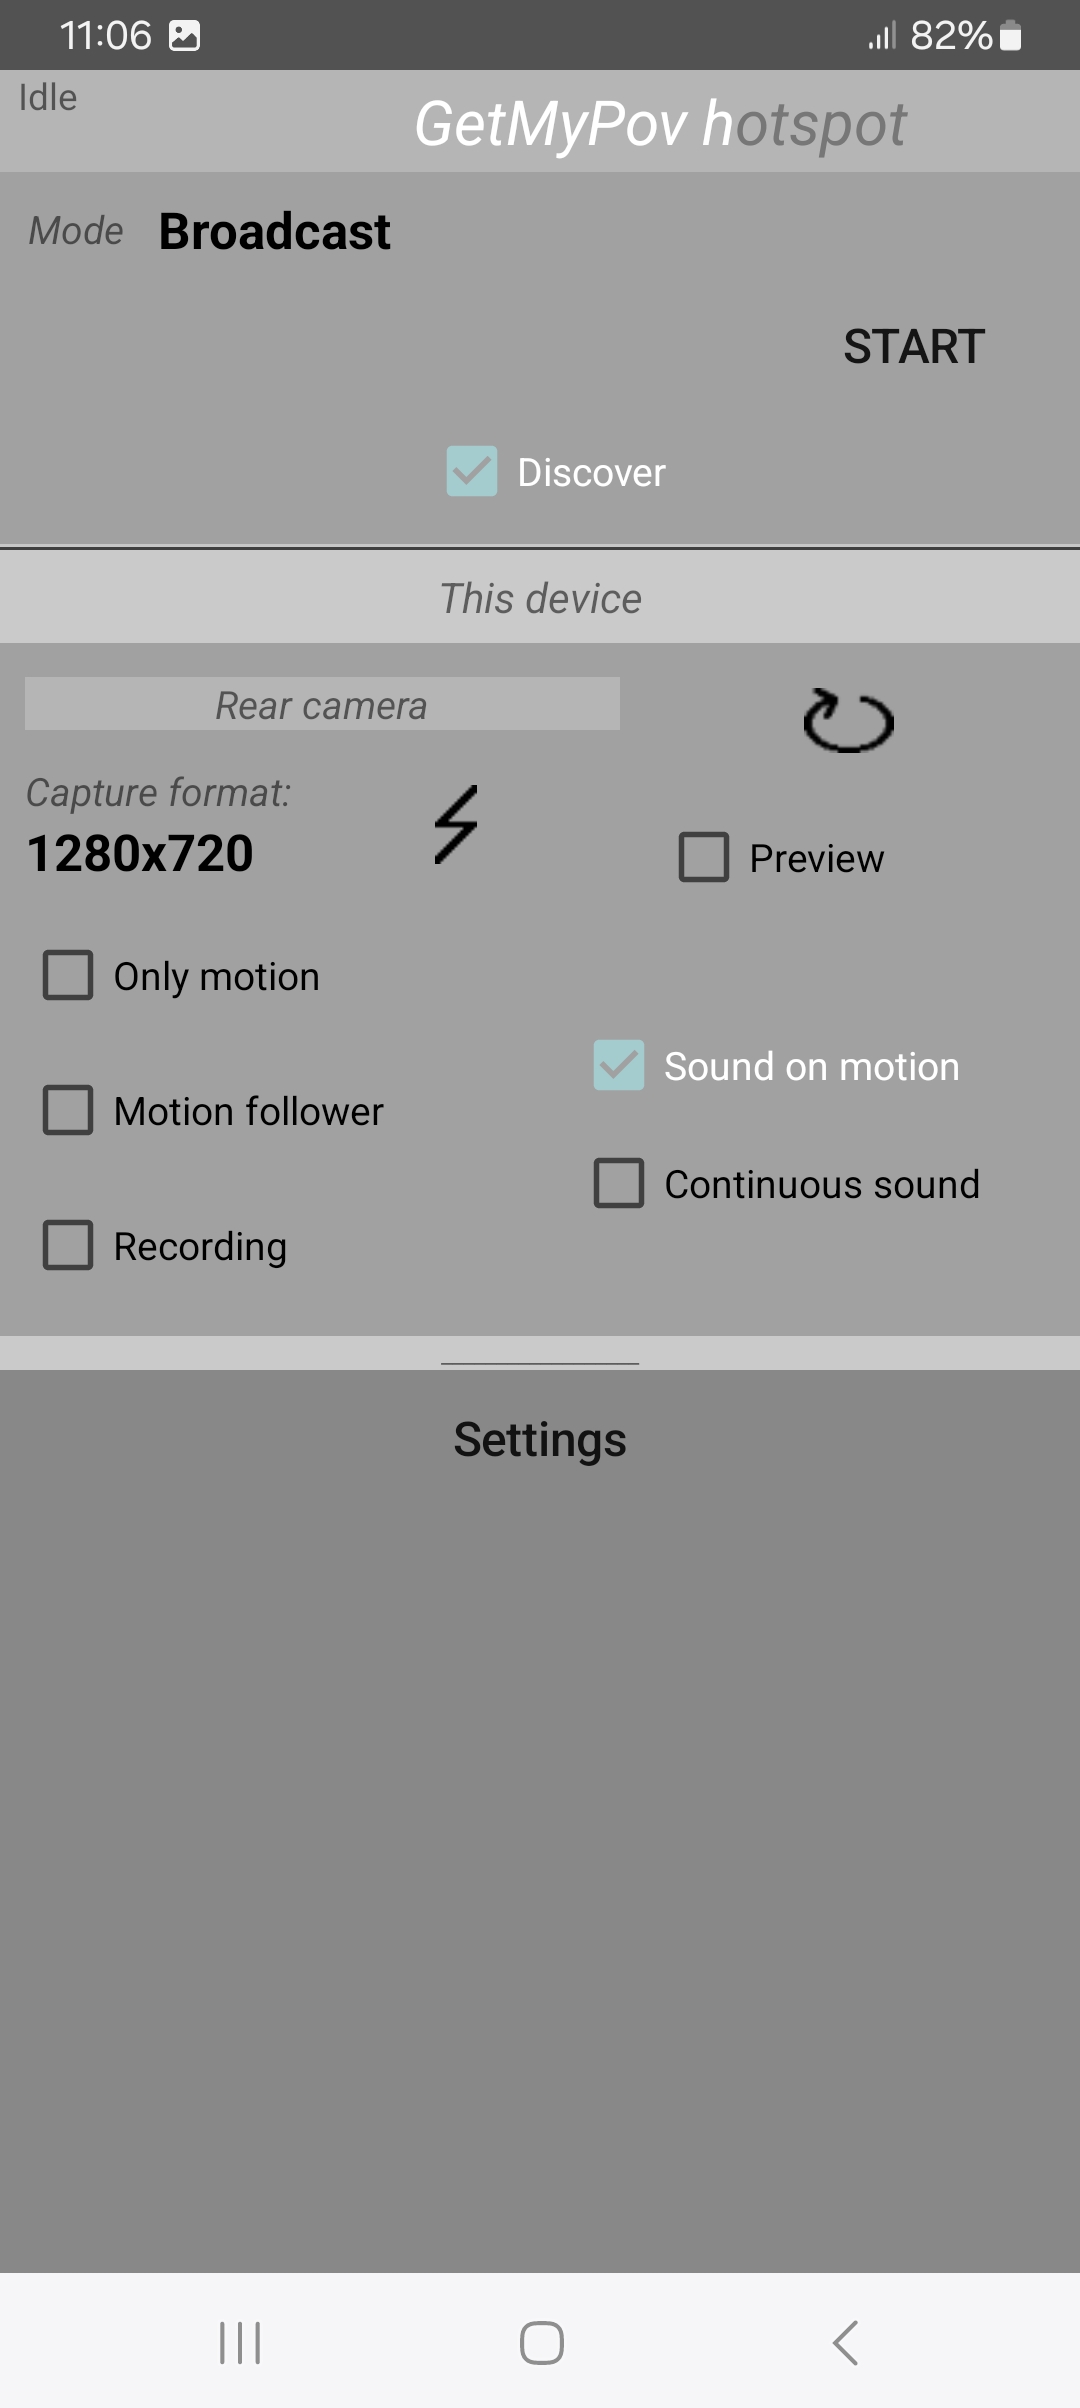
GetMyPov h - Specific features
Introduction
Differently from the other two apps of the family, GetMyPov h supports the interaction with many partners, at the same time, either transmitting video streaming to them or to receive it from them.
All the following app specific modes prepare the device to get several connections and the Discover checkbox on the panel drives the automatic discovering of the partners inside the local network.
The specific app modes
- Broadcast (Look at the short video)
It supports the broadcasting of the video streaming to many smartphones, set to receive only: any request for transmitting back a video streaming is rejected and the remote user has notice of this.
Once the connection to each of the partners occurs, a dedicated outgoing streaming starts for each partner.
In the monitor line the item "out fps" displays the current transmission rate to each of the partner in a randomly switched way.
A part the multiplicity of partners, in this mode the app behaves exactly like GetMyPov f / GetMyPov c when the "Camera" checkbox is enabled. This is true both in local administration and when controlled remotely by a GetMyPov c instance.
The plus of this mode is right that, the device even as a controlled unit performs as broadcaster: the effect of control is perceived by all the "followers".
- Broadcast II
It is like the previous mode with the following differences/additions:
- It uses "Quality II" settings specification, An independent setting that can be used in specific contexts like document sharing in a meeting.
- It accepts one (and only one) incoming streaming (that is it gets the capturing activity of one partner) to be followed during the broadcast (it means that the first partner discovered with the camera activated is accepted and any next partner so configured is rejected). The app, therefore, can even control this transmitter.
- Repeater
It allows to receive a video streaming from a device and to broadcast it to a set of "listening" devices.
When the "Discover" checkbox is selected, after started the session by means of the usual "start" button, it is advisable, first, to start the session on the transmitter device because, in repeater mode, the app looks selectively for the watcher partner within a reasonably short time. Once the watcher has been discovered, followers have freedom to start listening when they wish.
The monitor line shows the "in fps" value, uniquely determined (the watcher to repeat is only one), and the "out fps" value that behaves like in the 'broadcast' mode.
The discovering of the watcher is enough for:
- the repeater to visualize and/or possibly to record what is getting from the whatcher
- the Remote device section to appear: with it the repeater can even control the watcher (see Remote device section) and access to its remote desktop.
The repeater mode is equipped with possibility to have the receiving/collector side acting as a network server, as such directly addressable inside the local network and, therefore, reachable from the outside through a public-IP-router port forwarding. With this option active automatic-discovering of partners can still be applied for the followers as potential targets of the broadcasting. Note: without this option activated the receiving side of the Repeater mode runs as a network client, just like what is done in respect of the followers.
Repeater mode, 'repeats' not only the video streamings and control commands that go in the opposed versus, but also the remote desktop access: either the repeater machine can access the desktop of the watcher or the followers can do the same.
- Controller
In this mode the app makes no use of local cameras and interacts with partners that have their camera activated.
If only one partner is found, the app panel behaves like a "simple" panel, like that one of GetMyPov f / C when acts only as a receiver.
If the app iteracts with more than one 'watcher', then the visual area is split in a quantity of rectangular subareas greater enough to display all the incoming scenes.
Note that if the "Discover" checkbox is unset, the required subareas are, in quantity, the number of 'enabled' records existing in the connection database.
A particular split-up event is that one that drives the screen from the single scene to the multi-scene situation, since also a change in the user interface occurs: in a multi-scene layout there are not commands related to the various video streamings.
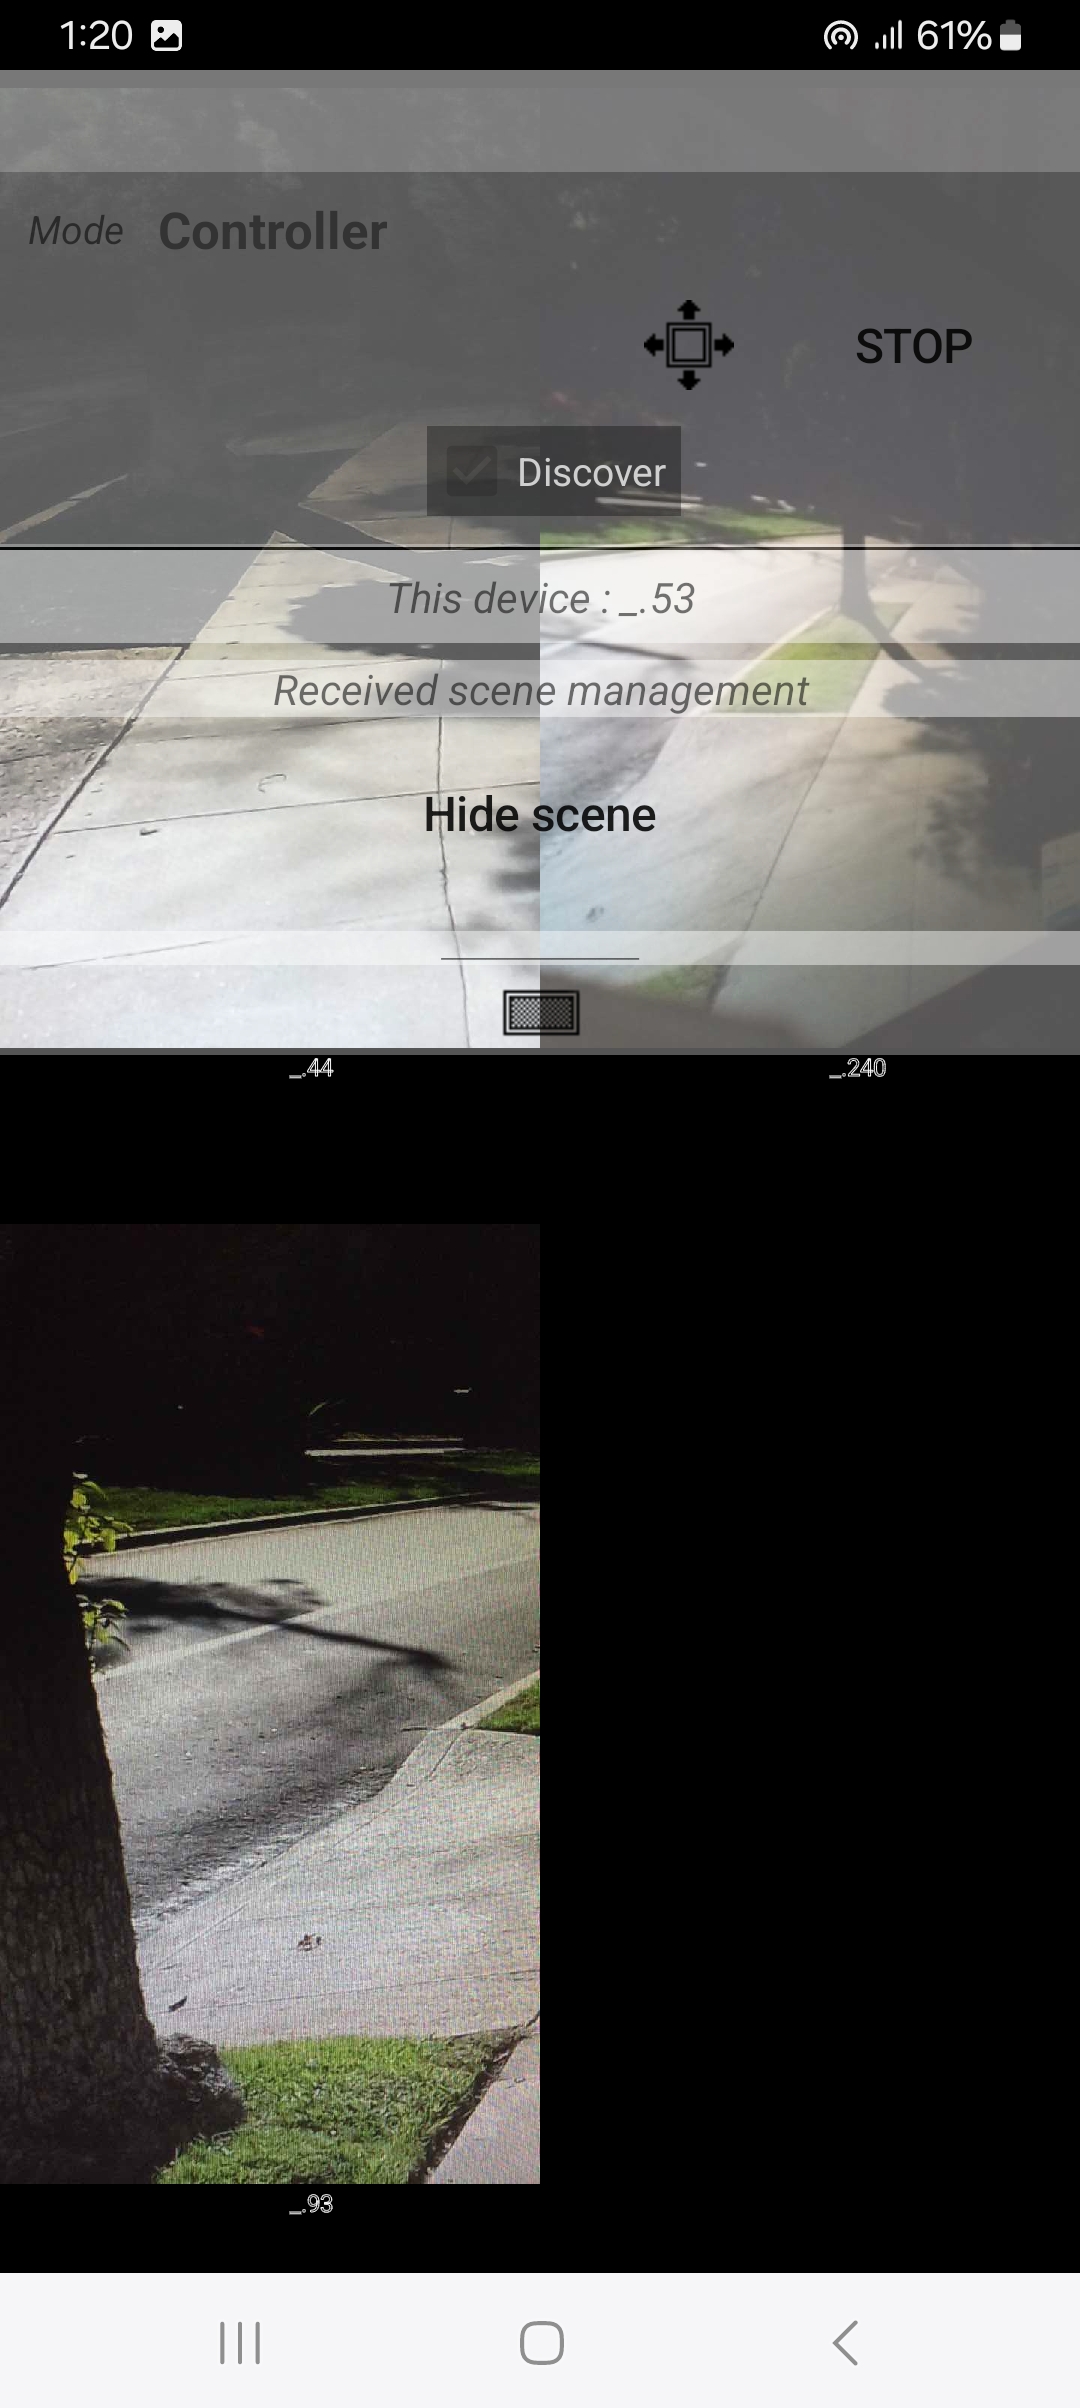
Actually the multi-scene layout presents a necessary overview of what is incoming - next the user can decide to inspect each of the scenes and even to control the correspondingly transmitting device and possibly to access to its remote desktop. How to do it ? see below.
Inspecting a scene and going back to the overall view
The user first has to enter the full-screen mode, then a look at the bottom side of each area allows to choose the scene to inspect, basing on the name of the emitting device. At this point a touch on the scene lets the user enter the 'single scene' view, equipped with the already met command panel, useful to see and record the remote scene, to control the transmitting smartphone and to access the its remote desktop.
A further button appears here, however: it is the 'Back' button
 inside the 'Received scene management' section. It leads back to the overall view, in full-screen
mode to offer "a touch" on another scene.
inside the 'Received scene management' section. It leads back to the overall view, in full-screen
mode to offer "a touch" on another scene.Multi scene view informs also when a emitter suspends itself or enter the no-motion state, showing, respectively, "[SUSP.]" or "[NO MOT.]" next to the name of the emitting device, while the sub-area becomes black.
When the connection with an emitting device is lost, the sub-area becomes black also, no literal is shown and it is still possible to tap the sub-area to enter the inspection of it, this time as the specific point of waiting for reconnection.
From the full-screen mode of the multi-scene view the user can exit by means of a long touch performed anywhere on the visual surface.
From the two different layouts of the user interface derives that the stop of the session is performable in both of them.
In this mode the app can perform multiple recording at the same time, all managed independently one another. In the overall view the user can get even an overall perception about recording: each scene under recording shows a small red square next to the name of the emitting device. In addition, if the visualization (that can be intensive about graphics drawing) is not needed, the user can turn it off, by means of the Hide scene button, getting this way two possible different lists at the top:
- a not colored list of the connected device with no ongoing recording associated
- a red colored list of the device whose scene is being recorded
If the user activates the recording option in the idle state of the main panel, that is before starting the session, at the "Start" the user is asked to extend the recording to all the future connections occurring within the session:
- If the user answers "yes", simply all will be recorded until some of the recordings is stopped; this event change the default behavior for next connections.
- If the user answers "no":
- if one only watcher is addressed, for it recording is let be on
- if more than one watcher is addressed, recording is off for all the watchers
- Remote recorder
Beyond sharing the common features, in this app the mode makes the device to behave as network client in respect of any potential partner. In addition, here, the automatic discovering is driven by the "Discover" checkbox located in the app panel.